
Home, Auto Repair Library, Auto Parts, Accessories, Tools, Manuals & Books, Car BLOG, Links, Index

Repairing your car's brakes means doing a complete job that does not leave important things undone to save time and/or money. We are talking about things like rebuilding or replacing high mileage calipers and wheel cylinders, replacing disc and drum brake hardware, resurfacing or replacing drums and rotors, changing the brake fluid and bleeding all the lines, checking and adjusting the parking brake and even checking the ABS system.
Overlooking items such as these may have no immediate impact on how your brakes work, but it may at some point down the road. And that can often mean the difference between a brake job that lasts and one that does not.
Not everybody can afford a comprehensive overhaul of their brake system, and many vehicles don't need a lot of work if only the pads are worn. But in instances where additional work can prolong the life of the brake system, improve safety and/or enhance brake performance, it should be done.
For instance, there's no need to reline the rear brakes when installing a set of front disc brake pads as long as the rear brakes are in good condition. But if the shoes are marginal or have been contaminated by fluid leaks or grease, they should be replaced -- along with any other drum components that are not in acceptable condition. Even if the shoes are still within service limits, you should ask yourself if they'll last as long as the pads you're replacing up front. If the shoes don't have a lot of meat left in them, install new linings on the rear brakes as well.
Whether or not the brake calipers and wheel cylinders need attention also depends on their condition. Any sign of leakage or binding calls for immediate repair or replacement. And even if they're not leaking, sticking or frozen, you can rebuild or replace these components for preventive maintenance to extend the life of the brake system. Caliper seals harden with age and piston bores corrode. When a piston is shoved back into its bore to accept new thicker pads, seal wear may accelerate if the seals are rubbing against a pitted or corroded surface. This can lead to fluid leakage and contamination of the brake pads.
Before you start any brake work:
NEVER crawl under an improperly supported vehicle. In other words, never trust a jack alone to hold the vehicle up. Always use a pair of support stands positioned underneath the vehicle to keep it from falling on you. Make sure the weight ratings on the support stands is more than adequate to hold up the vehicle's weight, too. Do not use blocks of wood, boxes, wheels or bricks for supports because these may slip or collapse and allow the vehicle to fall.
Wear breathing protection (an OSHA-approved mask, not just a cheap dust mask) when removing brake dust. NEVER use an air hose to blow brake dust off brake components. Brake dust may contain asbestos or other fibers that can cause lung disease if inhaled. Use a liquid cleaner to remove brake dust.
Do not open any brake lines or replace any components in a vehicle equipped with an "integral" ABS system (one where the master cylinder is combined with the ABS modulator, pump and pressure accumulator) without first depressurizing the system. This can usually be done by depressing the brake pedal 24 to 40 times while the key is off.
A growing number of late model cars are equipped with antilock brake systems that can precharge the brakes in anticipation of braking (to reduce braking reaction time), or actually apply the brakes automatically as a function of the collision prevention system (automatic braking).
CAUTION: If you are doing any type of brake work on these vehicles, the braking system MUST BE DEACTIVATED before you work on the brakes, otherwise the system may energize the brakes unexpectedly causing the caliper pistons to push outward with considerable force. This could pinch your fingers if they are between the pads and rotors. If the pads have been removed, the pistons can blow out of their calipers. This can happen even when the ignition and engine are off!
The antilock brake system can be deactivated by locating and removing the main power fuse for the ABS system, or by using a scan tool to temporarily deactivate the system. Disconnecting the battery also works, but this may cause loss of certain memory settings in various vehicle modules. See Battery Disconnect Cautions & Problems for more information on this subject.
Good brakes are absolutely essential for safe driving, so the foundation of a complete brake job begins with a thorough inspection of the entire brake system, including the antilock brake system if the vehicle is so equipped.
On ABS-equipped vehicles, turn the ignition on to verify the ABS warning light circuit works. The ABS light should come on for a few seconds then go out if everything is fine. No light? Then you've found a bulb that needs replacing or a wiring problem. If the light comes on and remains on (does not go out), then further diagnosis will be required to find out what's wrong with the ABS system. For more information about ABS brakes, see Carley's ABS Guide.
On some ABS systems, faults may have occurred that may not be serious enough to cause a continuous ABS warning light. These may be stored in the ABS module's memory as "non-latching" or "soft" fault codes. To read ABS codes, you need a scan tool with ABS capability.
Next comes the brake system itself:
Apply the brakes and start the engine. Does the pedal drop slightly? That's good because it indicates a good vacuum booster. No boost may indicate a leaky booster diaphragm or vacuum connection.
How does the brake pedal feel? Is it firm? A soft or mushy-feeling pedal usually indicates air in the lines or leaks. A pedal that slowly sinks is a classic symptom of a worn master cylinder. Is the amount of pedal travel normal? A low pedal may indicate worn linings, the need for adjustment, defective or frozen drum brake adjusters or a low fluid level.
Do the brake lights come on when you step on the pedal? No lights may indicate a defective or misadjusted brake light pedal switch or burned out bulbs in the tail lights.
Apply the parking brake. Does the pedal or handle work smoothly? Is it adjusted properly? Does the brake light come on? No brake warning light may indicate a bad bulb or defective or misadjusted parking brake switch. Does the parking brake hold the vehicle? Put the transmission into gear while the parking brake is applied. If it fails to hold the vehicle, it needs adjusting. Now release the parking brake. Failure to release fully means the linkage or cables need attention.
Open the hood and check the fluid level and its appearance. A low level may indicate a leak or worn linings. Discoloration indicates moisture contamination and the need for a fluid change.
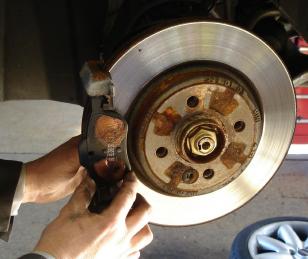
Remove a front wheel and measure the thickness of the brake pads. If worn down to minimum specifications or if wear indicators are making contact with the rotor, new linings are needed. If the pads are still above specs, you might want to replace them anyway if they are near the end of their service life or if they are noisy.
Replacement brake pads are available in many different brands and grades. Economy grade or "value" line pads are the least expensive. They are okay for many vehicles, but will not last or provide the same kind of stopping performance as standard grade or premium grade pads. Standard replacement pads are for everyday driving and are a good choice for many applications. Braking performance and service life should be similar to the original equipment pads. Premium pads (ceramic or semi-metallic) are usually recommended for vehicles where wear and/or noise has been a problem, or for hard-use, high temperature applications. Ceramic pads are also low dusting, so they are a good upgrade if you drive a European vehicle and you don't like to see black brake dust on your wheels.
Because of the different friction characteristics of different kinds and brands of brake pads, you should replace same with same, or better.
If your car came originally equipped with nonasbestos organic (NAO) pads, you should look for replacement pads that are NAO. Or you could upgrade to ceramic pads for longer life and quieter braking, or even semi-metallic pads for high temperature, hard use driving.
If your car came originally equipped with ceramic pads (which are found on many late model cars), you should buy some brand of aftermarket ceramic pad. Likewise, if you drive a large SUV that is equipped with semi-metallic pads, you should replace them with an aftermarket quality brand of semi-metallic pads.
When you remove the old pads, look for uneven wear. If the inner or outer pad shows much more wear than its companion, the caliper may be sticking. This should be fixed before the new pads are installed.
Also check the old pads for any sign of contamination (brake fluid, oil or grease). If the caliper is leaking brake fluid, it must be rebuilt or replaced before new pads are installed. The same goes for a leaky wheel cylinder in a rear drum brake. Oil or grease can come from a leaky wheel bearing or axle seal.
Before you can install the new pads, the caliper piston(s) must be pushed back into the caliper to make room for the new pads (which will be thicker than the old worn pads). A large C-clamp can be used for this purpose.
When the new pads are installed, make sure they fit snugly in the caliper mount. If any mounting shims, springs or anti-rattle clips are badly corroded or missing, install new mounting hardware. Also inspect the caliper bushings, pins and slides for damage, wear or severe corrosion. Replace as needed.
Also note the condition of the rotors. Deep scratches or grooves indicate a need for resurfacing. Are there discolored spots, heat cracks or warpage? These may also indicate a need for rotor resurfacing or replacement.
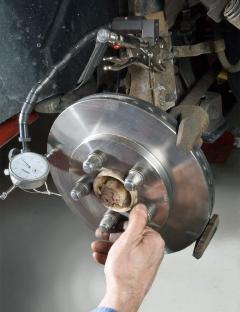
Measure runout and parallelism, too. As a general rule, the rotors on most cars and trucks should have less than .003 inches of runout, and some cars cannot tolerate any more than .0015 inches of runout. If runout is higher than this, it might be corrected by reindexing the position of the rotor on the hub (Note: hub runout should also be checked, resurfacing the rotors on the vehicle with an on-car lathe, or by installing tapered shims behind the rotors.
Note the condition of the calipers and caliper mounts. Also note whether or not the pads are worn evenly. Uneven pad wear can be caused by corrosion on the caliper mounting guides or keyway.

Pull a drum and inspect the drum surface, brake shoes, hardware and wheel cylinder. If the shoe linings are at, or below minimum specifications, new shoes are needed. If the linings are still above minimum specs but are getting thin, new shoes should be recommended to extend the life of the brakes.
Check everywhere for leaks: the master cylinder, proportioning valve, steel brake lines and rubber hoses, and ABS components if so equipped. Have a helper apply the brakes while you look underneath. Rubber hoses should not expand under pressure. Any hoses that are chaffed, cracked or swell under pressure need to be replaced.
Any leak is a potential safety hazard because loss of fluid can mean loss of stopping power. If you discover a leak, do not postpone repairs because leaks create a potentially dangerous situation.
That brings us to the problem of noise, which seems to be an especially troublesome problem these days for many vehicles. Another aspect of the complete brake job is doing everything you can to minimize noise.
Anything that causes or increases vibration amplifies brake noise. This includes excessive runout or roughness on the face of the rotors, glazed linings, loose pads, even rusted, worn or loose caliper mounts.
Resurfacing the rotors may therefore be necessary to reduce pad vibration. You might also install pad shims or insulators to dampen vibrations between the pads and calipers and new caliper mounting hardware to prevent problems here, too. Brake grease can also be applied to the backs of the pads to dampen noise.

Rotor resurfacing is not necessary when the pads are replaced IF the rotors are in reasonably good condition (within acceptable runout, parallelism and wear specs). Even so, there are valid reasons for having the rotors resurfaced.
If a rotor is close to the OEM minimum thickness specification or cannot be resurfaced without exceeding the spec, then the rotor is near the end of its useful service life and replacement is recommended. If the rotor is at or below the minimum thickness specification, it must be replaced.
Worn rotors are dangerous rotors for three important reasons:
Another reason for resurfacing rotors is if lateral runout or wobble exceeds OEM specs. You can attempt to reindex the rotor, but the best solution is to resurface the rotor on the vehicle with an on-car lathe. The lathe will cut the rotor true to the caliper mount or hub (depending upon how the equipment is mounted).
Resurfacing may also be needed if parallelism between the rotor faces exceeds OEM specs (generally about .0005 in.). If the rotor is warped or has hard spots, it will have to be resurfaced or replaced.
Hard spots that develop from overheating or uneven torquing of lug nuts can create raised areas on the surface that often extend below the surface. The metallurgical changes in the rotor will often cause the hard spots to return after a few thousand miles, so rotor replacement might be the best repair recommendation.
Regardless of the type of rotor resurfacing equipment used, always remove the least amount of metal necessary to restore the rotor surface. This will maximize rotor life. After turning the rotor on a lathe, some technicians will buff both sides of the rotor with a Flex Tool or sand the rotors with #120 to #150 grit sandpaper with moderate to heavy force for 60 seconds on each side to create a smooth, nondirectional or crosshatch finish. This is done to minimize the risk of noise with semimetallic pads.
A complete brake job may also include new hardware. When replacing brake shoes, pay close attention to the condition of the hardware -- especially the all-important return springs. Over time, heat weakens the springs and reduces their ability to pull the shoes back from the drum when the brakes are released. The brakes may begin to drag causing shoe wear to accelerate and fuel economy to take a noticeable dip. As the springs continue to age, they get weaker, stretch and may eventually break. MAP says there's no reason to replace the springs unless they are obviously stretched, heat discolored, broken or damaged. But because of the risks associated with reusing high mileage springs and mounting hardware, you should install new return springs and other brake hardware -- especially if the vehicle has a lot of miles on it.
If a parking brake cable is badly corroded and needs replacing, replace both cables to minimize the risk of future problems.
And don't forget the wheel bearings. The greasable variety in older rear-wheel drive vehicles need to be cleaned, inspected, repacked with fresh grease, reinstalled with new seals and adjusted to specs. The sealed variety should be inspected for excessive play or roughness. If either type are not in acceptable condition, they need to be replaced.
Be sure to lubricate the shoe support pads on the drum backing plates with brake grease (never ordinary chassis grease). Also, lubricate the parking brake mechanism.
A complete brake job also includes fresh brake fluid. Bleeding is necessary for two reasons:
Brake fluid absorbs moisture over time, which lowers its boiling point and contributes to internal corrosion.

Changing the fluid periodically (every two years or when the brakes are relined) for preventive maintenance rids the brake system of unwanted moisture, restores the fluid's boiling temperature and prolongs the life of the hydraulic components by minimizing the potential for internal corrosion. This can be an especially important consideration on vehicles equipped with antilock brakes (ABS) because of the high replacement cost of the hydraulic modulator assembly.
When you've completed your brake repairs, pump the brake pedal several times to confirm the pedal is firm before moving or driving the vehicle. If this is not done, the pedal may go to the floor and the brakes may be unable to stop the vehicle!
Do a short test drive at slow speed to confirm the brakes are working properly. The pedal should feel firm, the brakes should apply without pulling or grabbing, and you should hear no noise.
Perform 30 stops from 30 miles per hour with a 30-second cooling interval between stops. These stops will be performed at a decelerating rate of 12 feet per second or less. This means that it should be a gentle easy stop.
The 30/30/30 Burnish Procedure beds the pads and shoes into the rotor and drums. It also deposits the necessary friction transfer to the rotors and drums for optimum brake performance.
Do NOT go out and slam on the brakes as hard as you can. This can glaze the pads resulting in brake noise and reduced stopping performance. Take it easy on the brakes the first couple hundred miles of driving.
If the pedal feels soft or spongy, there may be air trapped in the brake lines. You should bleed the brake lines again to remove the air. If the pedal has too much travel, the self-adjusters inside the drums may need to be readjusted to reduce the clearance between the shoes and drums.
If the brakes pull or grab, a caliper may be sticking or there may be oil, grease or brake fluid on the pads or rotors. Inspect and clean as needed.
WARNING: DO NOT USE OIL, GREASE, ANTI-SEIZE OR LUBRICANTS OF ANY KIND WHEN TIGHTENING LUG NUTS!
Proper torque on lug nuts is very important for three reasons. One is to keep the lug nuts from loosening up and the wheel coming loose, another is to prevent distortion of the brake rotor behind the wheel, and a third is to prevent broken studs. A torque wrench should be used for final tightening of the lug nuts, and the nuts should always be torqued to the recommended specifications.
CAUTION: Torque specifications for lug nuts are always for CLEANand DRY studs and lug nuts. That means no oil, no grease, no anti-seize and no lubricants of any kind. Any of these products will reduce the friction between the threads. This may seem like a good thing to prevent rust and frozen lug nuts, but the reduction in friction means a much higher percentage of the applied torque (up to 25% or more) will go toward loading the lug nuts. The end result may be brake rotor distortion or broken studs!
Wheel studs should be cleaned with a wire brush to remove rust and dirt BEFORE the wheels are mounted. If the lug nuts are heavily rusted or have damaged threads and won't turn easily on the studs, replace the lug nuts. The same goes for any wheel studs with damaged or badly corroded threads. And remember to mount the wheels DRY with nothing on the threads.
 More Brake Articles:
 Click Here to See More Carley Automotive Technical Articles