 More Brake Articles:

Replacing a set of brake pads is a common brake repair procedure. But if not done correctly, it can cause problems. Brake systems are very sensitive to rust and corrosion and should receive a thorough cleaning when new pads are installed. Residual rust or corrosion left in critical areas can cause brake issues almost immediately.
What follows is a step-by-step guide on how to change the brake pads on your car, truck or SUV. We have noted some cautions, so read carefully before proceeding. We have also included some important tips on how to break in a new set of brake pads and how to avoid brake problems down the road.
Many late model cars are equipped with antilock brake systems that can precharge the brakes in anticipation of braking to reduce brake reaction time and decrease the stopping distance. A growing number of these vehicles can also automatically apply the brakes if the driver fails to do so in time to prevent or reduce the severity of an accident (collision prevention system).
CAUTION: If you are replacing the brake pads on a vehicle with automatic braking or precharging, the brake system must be DEACTIVATED before you work on the brakes, otherwise the system may energize the brakes unexpectedly causing the caliper pistons to push outward with considerable force. This could pinch your fingers if they are between the pads and rotors. If the pads have been removed, the pistons can blow out of their calipers. This can happen even when the ignition and engine are off!
The antilock brake system can be deactivated by locating and removing the main power fuse for the ABS system, or by using a scan tool to temporarily deactivate the system. Disconnecting the battery also works, but this may cause loss of certain memory settings in various vehicle modules. See Battery Disconnect Cautions & Problems for more information on this subject.
The basic procedure for replacing the front brake pads goes as follows:
1.Park your vehicle on a level surface, set the parking brake and place the transmission in Park (in gear if manual shift). Then loosen the lug nuts while the weight of the vehicle is still on the wheels. Do NOT remove the lugs nuts yet!
2.Raise the vehicle with a floor jack until the front wheels are off the ground. Support the vehicle with TWO safety stands. Do NOT rely on the jack alone to support the vehicle.
3. Remove the lug nuts and remove the wheel from the hub.
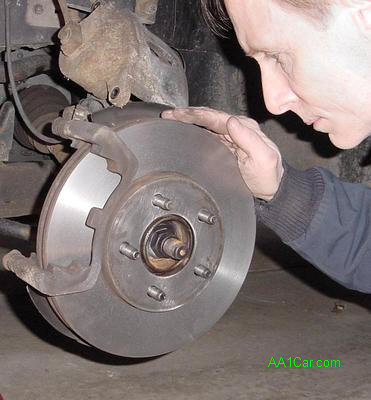
4. Inspect the rotors for excessive wear, cracking, heavy grooving, corrosion or heat damage (discolored hard spots that can cause pedal pulsations when braking). If the the rotors are not in like-new condition, replace them with new rotors. Old rotors can sometimes be resurfaced on a brake lathe if not worn to minimum or discard thickness. But most auto parts stores no longer turn rotors because it is faster, easier and less troublesome to sell you new rotors.

5.Determine how the brake calipers are mounted, and remove the pins or bolts that hold the calipers in place. On some applications, you can remove one pin or bolt and rotate the caliper up away from the rotor to replace the pads. On others, both bolts must be removed so the caliper can be lifted up and away from the rotor to change the pads.


CAUTION: Do NOT allow the calipers to hang by their hoses as this may damage the hoses. Rest the calipers on a suspension component (if possible) or support them with a piece of heavy wire.
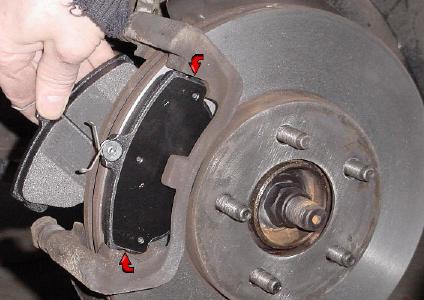
6. Remove the inner and outer pads from the caliper. The brake pads may be held in place with wires or clips. Be careful not to damage these clips. Save them for reuse when the new pads are installed.
7. Once the pads have been removed from the calipers, inspect the calipers carefully to make sure they are not leaking any fluid, and that the piston dust seals are not cracked or damaged. If a caliper is leaking, it will have to be replaced or rebuilt with new piston seals. Cracked dust seals should also be replaced to help protect the pistons.
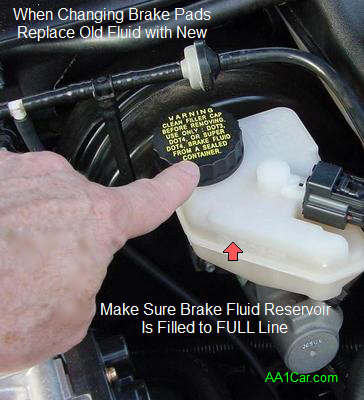
8. Use a large C-clamp to carefully push the caliper pistons back into the calipers. This is necessary so there will be enough clearance for the new (thicker) brake pads. It may be necessary to remove some fluid from the master brake reservoir so it does not overflow when the pistons are pushed back into the calipers as this will displace brake fluid back to the master cylinder.


9.Install the new inner and outer brake pads into the calipers. Replace any shims, springs or clips that were used with the original pads to hold them in place (unless new hardware or shims came with the new pads, in which case discard the old shims or hardware and replace with new). Apply a light coating of moly based brake lubricant (never ordinary grease) to the BACKS of the pads and to the points where they contact or rest against the calipers. Do NOT get any grease on the front (friction side) of the pads as this will ruin the pads and cause uneven braking.
10.Lubricate the caliper mounts and pins, and reinstall the pins or bolts, slide the caliper back into place over the rotor and tighten the mounting bolts to specifications with a torque wrench. If the original pins, bushings or bolts are badly corroded or damaged, replace them with new. Do NOT reuse badly corroded or damaged mounting hardware.

11. Remount the wheels on the hubs, tighten the lug nuts, then lower the vehicle until the tires are on the ground and final tighten the lug nuts to specifications with a torque wrench using an alternating star pattern (necessary for even loading and to prevent rotor distortion).
12. Start the engine and pump the brake pedal several times until the pedal feels firm. Do NOT drive the vehicle without first pumping the brakes to make sure your vehicle will stop when you apply the brakes! Then do a short test drive and do a series of gradual stops from about 30 mph with gradual braking. This will allow the pads to seat against the rotors and heat cure any uncured resins in the pads themselves. Some replacement pads also have a special coating that helps lubricate and seat the pads as they break in.
Do NOT slam on the brakes and avoid hard braking for the first couple hundred miles of driving.
Also Recommended When Changing Brake Pads: Change the Brake Fluid Too! If the brake fluid in you vehicle is more than 10 years old, or has over 100,000 miles on it, the corrosion inhibitors in the fluid are probably depleted, increasing the risk of corrosion inside your brake system. The fluid will also be saturated with moisture, which lowers the boiling temperature of the fluid and increases the risk of the fluid boiling and brake failure if the brakes get unusually hot as a result of continuous mountain driving or repetitive heavy braking. Use the type of brake fluid recommended by your vehicle manufacturer (typically DOT3 or DOT4). See the label on the master cylinder reservoir or the fluid specifications in your vehicle owners manual.
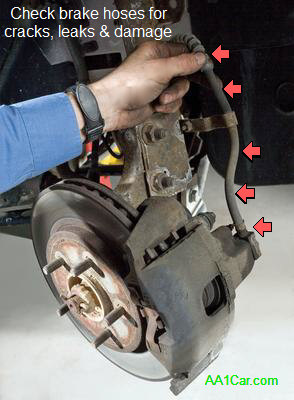
Also Recommended: Carefully Inspect the Entire Brake System. The entire brake system should be closely examined for fluid leaks, unusual wear, severe corrosion or physical damage. This includes all of the rubber and steel brake lines, the rear calipers (or wheel cylinders if drum brakes), front calipers, master cylinder and ABS components. Replace hoses, steel brake lines or other brake components as needed to prevent loss of fluid and sudden brake failure! Do NOT drive with leaky brakes. It's too dangerous!
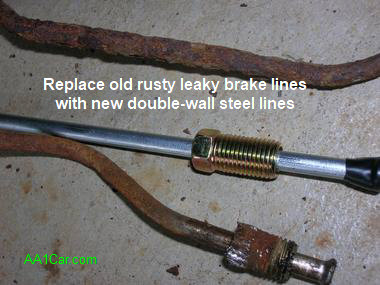
Rusty steel brake lines are a common problem on older, high mileage vehicles, especially in northern climates where they use corrosive road salt in the winter to deice the roads. Rubber brake lines also deteriorate with age, and become brittle increasing the risk of cracking and sudden failure. The older the parts, the more likely they will be in poor condition and need to be replaced.
Brakes are one thing you do not want to cut corners on if you are trying to save money on a do-it-yourself brake job.
The following brake pad installation tips are provided courtesy of Bendix:
Calipers. Areas that are subject to movement or retain components or hardware should be cleaned, along with the pin bores. Therefore, calipers need to be disassembled during pad replacement. Use a round wire brush and cleaner to remove old lubricant and corrosion. Use a fine polishing disc in a die grinder at a lower speed to clean the area. Avoid being too aggressive, especially with aluminum components, to ensure you only remove corrosion and not any metal. Be sure any areas on anti-rattle clips or hardware are free of debris as this can affect their performance over the life of the brake job.
Calipers on Ford 3/4 and 1-ton trucks have seen slides freeze shortly after brake service if they are not properly cleaned.

Pad Abutments. Whether they are part of the caliper bracket or steering knuckle, pad abutments need to be clean and smooth. If there are any notches or grooves caused by pad movement, these parts should be replaced. Damage like this can cause excessive pad movement that leads to noise and vibration.
Hub assemblies. Use a polishing pad to clean rust from the hub face. Then use an over-the-stud hub cleaner to get in next to the studs. Leaving corrosion in these areas is one of the top causes for pulsations after a brake job is completed.
Mounting Pads. One area that is often overlooked is the mounting pad on the hub that mates with the wheel. If there is rust or debris on this surface, it can lead to rotor distortion and pulsations just as easily as if it were left on the hub.
Rotors. New or machined rotors should be washed with soap, warm water and a stiff brush to remove metal particles from the surface. If this final step is not taken, brake noise may likely result. It can also prevent proper filming of the rotor which will keep the new parts from getting their expected mileage.
Bendix also recommends you clean the rear calipers and drum and parking brake systems. All these components should receive a good cleaning, inspection, lubrication and adjustment before the vehicle hits the road.
More Brake Articles: Click Here to See More Automotive Technical Articles