
Home, Auto Repair Library, Auto Parts, Accessories, Tools, Manuals & Books, Car BLOG, Links, Index
Brake Rotor Inspection & Replacement
Copyright AA1Car.comAdapted from an article written by Larry Carley for Brake & Front End magazine
The condition of the brake rotors on your vehicle is important for good braking performance and safety. So here are some questions and answers regarding brake rotor service:
How smooth is smooth enough? Smooth enough not to cause pad chatter, noise and increased pedal effort. Turning a rotor too quickly on a lathe leaves grooves in the surface. The grooves are not parallel, but spiral inward towards the center because the lathe bits cut from the outside of the rotor toward the center. When these grooves make contact with the pads, they tend to grab and jerk the pads up and down, setting up vibrations that cause noise and may be felt through the pedal.
If you can feel the grooves with your fingernail, the rotor is probably too rough. Another test is to write your name on the rotor with a ball joint pen. If the ink breaks up into dots instead of a continuous line, the rotor is too rough. Smoother is always better because it affects the coefficient of friction, noise, pad seating, pad break-in and wear.
Too rough a finish on the rotors can also increase pedal effort because only the peaks between the grooves make direct contact with the pads (at least initially). As the brakes are used, the pads will eventually wear down the peaks and increase the area of contact. But this accelerates both rotor wear and pad wear. So again, smoother is better.
As a rule, most new OEM and quality aftermarket rotors have a finish somewhere between 30 and 60 microinches RA (roughness average) with many falling in the 40 to 50 RA range. Some say a rotor finish of 80 microinches or less is good enough for most vehicles. Others say 60 microinches is the magic number, or 50 microinches or less if the vehicle is especially sensitive to rotor finish.
The finish is affected most by the crossfeed rate of the lathe, and to a lesser extent by the depth of the cut. Most experts say the best finish is achieved by taking off the least amount of metal as possible. Not only does this extend rotor life, but it also reduces the amount of folded and torn metal on the surface of the rotor.
As a rule, the depth of a finish cut should be .002 to .008 inch. If the rotor is in bad shape, multiple cuts should be used: one or more rough cuts followed by a shallow final cut.
On bench lathes, a spindle speed of 100 to 150 rpm with a crossfeed rate of .002 inch to .005 inch per revolution should produce a smooth, high-quality rotor finish.
On bench lathes with adjustable spindle speeds, the spindle speed should be slowed down for larger rotors. One manufacturer suggests the following speeds: for 10-inch and smaller rotors, use 170 rpm; for 11- to 16-inch rotors, use 100 rpm; for 17-inch or larger rotors, use 60 rpm.
The type of tool bits used in a brake lathe also affect the surface finish. Round carbide bits generally produce a smoother finish than angular bits and allow a faster crossfeed rate to save time. Titanium bits with parallel, peripheral ground edges are considered premium bits for this type of work.
When turning composite rotors, be sure to support the rotor properly with large bell clamps or adapters to prevent flexing and chatter.
Should rotors be turned every time the pads are replaced? Many shops resurface rotors every time the pads are replaced whether they really need it or not. Why? Because they want to avoid comebacks. Besides, many customers might think they are not getting their money's worth if the rotors are not resurfaced as part of a brake job.
General Motors has a different opinion. In technical bulletin #00-05-22-002 to its dealers, GM says, "Brake rotors should only be turned when one of the following rotor surface conditions exist: severe scoring with depth in excess of 1.5 mm or 0.060 inch, pulsation from excessive lateral runout of more than .080 mm or .003 inch, thickness variation in excess of 0.025 mm or 0.001 inch, or excessive corrosion on rotor braking surfaces."
GM also says "Rotors are not to be resurfaced in an attempt to correct the following conditions: noise/squeal, cosmetic corrosion, routine pad replacement or discoloration/hard spots."
In other words, GM frowns on rotor resurfacing during what it calls "normal" pad replacement. But is any brake job ever normal? Every job is different and every rotor needs to be carefully inspected and evaluated to determine its condition when brake work is done.
GM says resurfacing rotors unnecessarily shortens rotor life. They also say resurfacing is "ineffective at correcting brake squeal and/or premature lining wear and should not be used to address these conditions, unless specifically directed to do so in a service bulletin." Yet, how many service bulletins have we seen over the years from GM and other auto makers who say the fix for a particular brake squeal condition on a certain make or model is to replace the pads and resurface the rotors? It can be rather confusing.

Brake rotor runout should always measure rotor runout before the rotors are removed for resurfacing. Why? Because if there is runout in the hub, it will make the rotor wobble as it spins. This, in turn, can lead to uneven wear and pedal pulsation.

Rotor runout can be caused by several things: variations in manufacturing tolerances, sloppy resurfacing procedures, a buildup of rust and corrosion between the rotor and hub, and uneven torque on the lug nuts.
As a rule, rotor runout should be less than .003 inch on most vehicles. Aiming for .002 inch or less runout is even better.
On 1997-2002 Chevrolet Malibu, 1997-1999 Olds Cutlass, 1999-2002 Olds Alero and 1999-2002 Pontiac Grand Am, GM says .0015 inch or less of lateral runout is needed on the rotors to prevent pedal pulsation.
If runout is excessive, try indexing the rotor on the hub to see if a change in position helps.
Once you know how much runout is on the vehicle, you can compensate when you cut the rotor on a bench lathe. Mount a dial indicator on the knuckle or caliper support and measure rotor runout. Note the location, amount and direction of the runout. After mounting the rotor on the lathe, check runout again with a dial indicator. If it isn't within .003 inch (and at the same location and direction) of what it was on the vehicle, adjust or shim the rotor mounting until the runout is duplicated.
Thin, tapered steel shims are also available for some vehicles to correct runout. The shim is installed behind the rotor with the thickest part 180 degrees opposite of maximum rotor runout.
The other alternative is to eliminate the runout using an on-car lathe to cut the rotors in place.

When used properly, both types of lathes can give you good results. However, unless you compensate for rotor runout on the vehicle when using a bench lathe, you can't guarantee a true running rotor when it goes back on the hub. That is one of the advantages of on-car lathes. They cut the rotor true to the direction of rotation and virtually eliminate runout problems. The drawback with some on-car lathes is they are expensive and require a certain amount of skill to setup (equipment with automatic compensation simplifies setup considerably).
On-car resurfacing is approved by most vehicle manufacturers, and is recommended for any vehicle that is sensitive to rotor runout. It can also save a lot of labor on cars that have hard-to-remove captured rotors (certain Japanese makes) and on rear disc brakes.
If a rotor is cut on a bench lathe without taking into account runout on the vehicle, it can create rotor wobble that will lead to pedal vibration and uneven rotor wear. Even if there is little or no runout on the vehicle, mismounting the rotor on the lathe can create runout as the rotor is cut.
Causes of this kind of runout include worn arbor hardware, not centering the rotor properly on the arbor, dirt or dings on the rotor hat or center opening that prevent it from mounting perpendicular to the arbor, or misalignment in the lathe itself. The key here is to inspect your lathe regularly with a dial indicator for runout, and to make sure the rotor is mounted as straight as possible when it is cut.
Opinions differ as to how much variation is OK in flatness and parallelism between the rotor faces. Some say as little as .0003 inch variation can cause a noticeable pedal pulsation on some vehicles.
The bottom line here is if the driver can't feel a pedal pulsation, the rotors are probably OK. But if there is a pulsation, you can usually assume the rotor is warped or has variations in thickness and needs to be resurfaced or replaced.
Measuring flatness and parallelism is difficult (some say impossible) because it requires numerous measurements all the way around the rotor (eight to 12 places at least). If the tip of the micrometer happens to line up with a small pit in the surface, it will give a false reading that may lead you to think the rotor is warped when in fact is isn't. Most technicians don't have the time to take all of these measurements, so they just turn the rotors, cross their fingers and hope the rotors are true. Usually they are.
Yes, thickness matters. Rotors must have enough meat to absorb and dissipate heat, and to maintain their structural integrity. Thin rotors are dangerous rotors that increase the risk of heat fade, cracking and failure. That is why most rotors have a "discard thickness" or "minimum machine to" specification on the casting. If you can't find it or the numbers are illegible, look up the spec in a service manual or electronic database.
The "machine to" spec includes a built-in safety margin of .03 to .06 inch. to allow for wear when the rotor is returned to service. But on Fords there is no "discard" dimension, only a "machine to" spec. Ford says their "machine to" spec leaves enough margin for safety so the rotor should last as long as the pads. However, if a Ford rotor is worn below the "machine to" thickness, it should not be resurfaced or returned to service. It must be replaced.
Rotor thickness should always be measured with a micrometer when linings are replaced, before rotors are turned, and after rotors have been turned to make sure the rotors are within specifications. There should be no argument on this point!
Hard spots in rotors lead to uneven wear and changes in thickness that cause pedal pulsation. Hard spots may be the result of poor quality castings or from excessive heat that causes changes in the metallurgy of the rotors. A sticky caliper or dragging brake may make the rotor run hot and increase the risk of hard spots forming. Hard pots can often be seen as discolored patches on the face of the rotor.
Resurfacing will shave the tops off the hard spots and restore flatness and parallelism, but it is only a temporary fix. Sooner or later the hard spots usually return and you have he same problem all over again. A better repair option here would be to replace the rotor. Cracks are another concern with rotors. Cracks can form as a result of poor metallurgy in the rotor (too hard and too brittle because the rotor was allowed to cool too quickly during the casting process). More often, they are the result of excessive heat (heavy prolonged braking or a dragging pad). Some minor surface cracking is tolerable and can often be removed by resurfacing. But large cracks or deep cracks weaken the rotor and increase the risk of catastrophic failure.
This debate has gone on for years. Most suppliers of bench lathes and on-car lathes say sanding after turning is not necessary as long as proper feed rates and sharp lathe bits are used. The finish should be within specifications and cause no problems.
Proponents of sanding, on the other hand, say it improves the finish by making rotors smoother. Sanding knocks off the sharp peaks, torn and folded metal left on the surface by the lathe bits, and may improve the surface finish 2 to 5 microinches for better pedal feel, pad seating and overall brake performance.
Rotors can be sanded various ways. One is to apply a non-directional finish with #120 to #150 sandpaper on a flat sanding block. Hold a pair of sanding blocks against the rotor for about 60 seconds while the rotor is turning at normal speed on the lathe. Another method is to use a flexible ball-style hone in a hand-held drill to buff rotor surfaces (medium #120 grit or fine #240 grit). A third method is to use an abrasive pad in a drill, but some say this technique is risky because it is hard to do an even job and metal buildup on the pad may actually make the surface rougher unless a fresh pad is used for each side of the rotor.
The best advice if you do sand is to do it carefully, evenly and don't remove too much metal. A minute or less on each side should be enough.
A related issue here is whether or not rotors should be cleaned after they have been turned or sanded. Though few people actually take the time to do it, washing with hot soapy water can remove bits of metal that would otherwise end up embedded in the new pads. Those who do wash their rotors say it reduces noise problems.
Should new rotors be given a "clean-up" cut before they are installed? Most rotor suppliers say no. Rotors are machined to specifications and are ready to install as-is from the factory. Resurfacing just reduces the life of the rotors and increases the risk of cutting runout into the rotors that was not there in the first place (if a bench lathe is used).
The flip side of this position is that new rotors may not be as perfect as the manufacturers say they are. Cleaning up the rotors before they are installed is cheap insurance against comebacks.
The comeback from the manufacturers is that quality rotors shouldn't need cleaning up. If there's a problem, it is only with cheap rotors that are inferior quality and are not manufactured to close tolerances. That's a good reason to buy quality rotors from a reputable supplier.
1. Examine the rotor for signs of heat checking and cracking. Make sure to check the collar (area where the hub meets the plate) and the outer edge. If any cracks or mechanical damage are found, the rotor must be replaced.
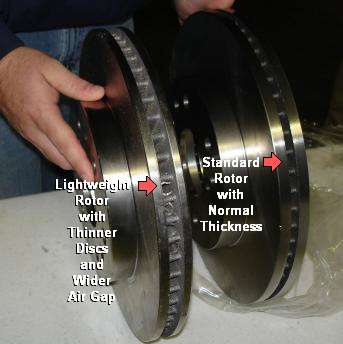
2. Compare the thickness of the rotor plates to an OE or premium-quality rotor. If possible, weigh the rotor on a scale and compare. If the weight and plate thickness are significantly below the OE or a premium-quality rotor, replace the rotor.
3. Measure runout in the rotor and wheel bearing with a dial indicator. Also, check the thickness of the rotor with a micrometer. On most vehicles, lateral runout greater than 0.002 inches will generate a pulsation complaint.
Note: If a new rotor is installed, it is not necessary to machine the rotor.
4. Inspect the caliper piston boots for heat damage. The material should be defect-free and pliable. The boots can be damaged by the elevated temperatures and will even catch fire. Any damage to the boot will cause an increased rate of wear to the caliper seal. Replace the damaged boot or caliper, if necessary.
5. Reassemble the caliper and bracket. Lubricate all slides, pins and hardware with the appropriate lubricant.
6. Replace the brake pads if they are glazed or show other signs of other mechanical damage like edge lift. Often, the extreme heat will change the chemical structure of the friction material and cause it to separate from the backing plate.
7. Test-drive the vehicle. If new pads were installed, perform the manufacturer's recommended break-in procedure.
Proper torque on lug nuts is very important for three reasons. One is to keep the lug nuts from loosening up and the wheel coming loose, another is to prevent distortion of the brake rotor behind the wheel, and a third is to prevent broken studs. A torque wrench should be used for final tightening of the lug nuts, and the nuts should always be torqued to the recommended specifications.
CAUTION: Torque specifications for lug nuts are always for CLEANand DRY studs and lug nuts. That means no oil, no grease, no anti-seize and no lubricants of any kind. Any of these products will reduce the friction between the threads. This may seem like a good thing to prevent rust and frozen lug nuts, but the reduction in friction means a much higher percentage of the applied torque (up to 25% or more) will go toward loading the lug nuts. The end result may be brake rotor distortion or broken studs!
Wheel studs should be cleaned with a wire brush to remove rust and dirt BEFORE the wheels are mounted. If the lug nuts are heavily rusted or have damaged threads and won't turn easily on the studs, replace the lug nuts. The same goes for any wheel studs with damaged or badly corroded threads. And remember to mount the wheels DRY with nothing on the threads.
 More Brake Articles:
 Click Here to see more technical articles