 More Engine Repair Articles:

When an engine has accumulated a lot of miles, the internal parts inside the engine may be worn or damaged and have to be replaced. Which engine parts you replace when you rebuild your engine will depend on their condition and whether you are overhauling the engine or just fixing something that is wrong with it.
The first step in rebuilding an engine is to correctly identify the engine. Auto makers are making constant changes from one model year to the next, and may even make mid-year changes, so to find the correct replacement parts for your engine you will need the year, make and model of your vehicle, and probably its VIN number. The VIN number can be found on a metal plate at the base of the windshield on the driver's side, or on the vehicle title or registration.
The digit or number in the VIN code that identifies the engine depends on the year and make. For 1981 and newer vehicles, the engine code is usually the 8th digit (Chrysler, GM & Ford), but may be the 4th digit (Jeep 1981-89). On 1980-81 Chrysler, the engine code is the 6th digit. On 1967-80 Fords, it is the 5th digit. On 1972-80 GM and 1974-80 Dodge & Plymouth models, it is the 6th digit. Once you know which engine you have, you can order the correct replacement parts or an engine overhaul kit.
There are two approaches to rebuilding an engine repair: you can replace individual parts piecemeal on an "as needed" basis to save money, or you can do a complete engine rebuild. The piecemeal approach is to replace only the parts that are worn or broken and leave everything else alone. The underlying motivation here is primarily economic. The vehicle and/or engine may not be worth spending much money on, so only those parts that absolutely have to be replaced to keep the engine running are replaced. Other repairs can wait for the next owner or the junkyard. This approach may skimp on needed machine work and attempt to "make do" with standard sized replacement parts such as bearings, rings, pistons and valves.
The other approach is to do a complete overhaul when the engine needs major repairs. This is obviously the more expensive approach, but one that usually provides much longer-lasting results. By replacing major wear components such as the rings, pistons, bearings, oil pump, valve guides, exhaust valves, valve springs, timing chain or belt, etc., the engine is restored to "like-new" condition. This approach may involve the purchase of an engine kit or buying the parts individually. It usually also requires having machine work done such as turning the crankshaft, overboring the cylinders, refacing the valves and seats, resurfacing the cylinder head(s), and maybe align boring or honing an overhead cam head and/or the main bores in the block.
The question is, how far do you want to go and how much money do you want to spend on your engine? An engine may need a valve job but may also has some wear in the cylinders. If you just pull the heads and have the valves redone, the improved compression may increase blowby into the crankcase if the rings and cylinders are worn.
The important point here is to decide what engine parts may be needed to fix a particular engine problem, and then to replace any additional parts that might also be needed.
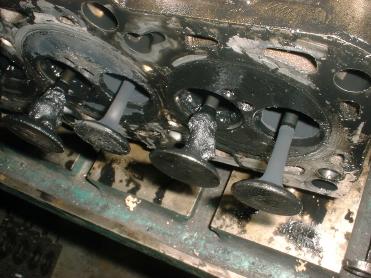
Before you replace anything, you first have to disassemble, clean and inspect your engine for wear, cracks and damage. Most high mileage engines are covered with grease and dirt, and likely have a lot of varnish and sludge inside. If the engine failed, there will also be metallic particles inside that will damage new parts if the engine is not thoroughly cleaned out before it is rebuilt.
Most machine shops can clean and inspect your old engine block, heads, crankshaft and other parts after you have disassembled the engine. The engine may be cleaned in a hot tank, thermal oven or with a high pressure spray washer. The important point is to remove all of the rust, grease, dirt, varnish and gasket residue so the parts can be carefully inspected.
Steel and iron parts such as the engine block, heads, crankshaft, rods, cams, etc., can be magnetically inspected for cracks. If cracks are found, the part is junk and needs to be replaced. Magnetic crack detection equipment doesn't work on aluminum blocks or heads, so penetrating dye is usually required to check for cracks.
If a block or head has cracks, a determination will have to be made by a machinist as to whether or not the cracks can be repaired. Cracks in cast iron heads and blocks can sometimes be repaired by drilling and installing overlapping iron or steel pins along the crack. Sometimes a crack can be filled by brazing or by a special flame welding technique (which requires a lot of skill to do successfully). But if the cracks are too extensive or in a place where a repair likely won't hold, you'll have to replace the cracked block or head.
NOTE: If a cylinder is cracked, it can sometimes be bored out and a repair sleeve installed to save the block.
With aluminum heads and blocks, cracks are also a problem. Cracks can sometimes be repaired by drilling and installing overlapping aluminum pins, but many shops prefer to grind out a cracks and weld it shut with a TIG welder.
Crankshafts require special attention because of the high loads they carry, and should always be magnetically checked for tiny hairline cracks.
Any parts that are found to fail inspection will have to be replaced.

Let's start with bearings. Common reasons for replacement include noise and low oil pressure. If a bearing has seized or spun, it will take more than a new set of bearings to fix the problem. The crankshaft journal will likely have suffered damage so turning the crank to undersize will probably be necessary. The big end of the connecting road may also be damaged or out-of-round which will require reconditioning the rod or replacing it.
Replacement bearings come in standard as well as various undersizes, so rule number one is to make sure the bearing size matches the crank journals. Typical undersizes include .010, .020 and .030 inch., which are usually marked on the back of the bearing shell. To determine the correct size if the crank has not been turned, the diameters of the rod and main journals on the crank must be measured with a micrometer. Machinists will usually mark the journal size on the crank if the crank has been reground. Bearing clearances should always be measured when the bearings are installed to make sure they have the correct fit.
The old bearings will often tell a story as to why they failed. If the bearings are full of scratches and abrasion, dirt and/or a lack of adequate lubrication probably played a role in their demise. Lack of proper maintenance (not changing the oil and filter often enough) may be the real culprit. A worn oil pump and/or clogged oil pump pickup screen may also have been factors, so these parts should also be inspected and replaced if necessary.
Use assembly lube when installing new bearings to protect the bearings and journals until the engine can be fired up. Dry starts ruin a lot of newly installed bearings, so priming the oil system prior to cranking the engine (if possible) can reduce this risk.

Pistons and rings may have to be replaced if a compression test reveals the rings are not holding a good seal. Taper, distortion or damage in the cylinder bores can be factors, too. Worn rings and/or cylinders will allow a lot of blowby into the crankcase. This reduces power, increases fuel consumption and emissions, and contributes to sludge formation as well as oil dilution (both of which are bad for the bearings).
Broken rings and/or cracked pistons are usually the result of detonation (spark knock), which may have a variety of underlying causes (no EGR, overadvanced ignition timing, a buildup of carbon deposits in the combustion chamber, cheap gas, engine overheating, etc.). Either of these conditions will also increase blowby and oil consumption.
Replacement rings come in various types, styles and sizes. Standard size rings are okay if the cylinders are not worn excessively (which requires measuring taper with a cylinder bore gauge). Oversized rings are required if the cylinders are worn and are bored to oversize.
Ring size will also depend on the pistons used (shallow groove or deep groove as well as groove height). Most late model engines have "low tension" piston rings that are thinner and narrower to reduce internal friction. Some are as small as 1.2 mm but the most common size is 1.5 mm. Rings designed for standard grooves must not be used in shallow groove pistons, nor should narrow rings be used in deep groove pistons. Chevrolet in particular has used a variety of different piston and ring combinations on some of its engines, so make sure the parts are properly matched.
The ring material as well as the facing (chrome or moly) should match the original application or be a suitable substitute for the original rings. Some high output and turbocharged engines use steel or ductile iron rings rather than plain cast iron rings.
Rings are sometimes damaged by improper installation. A ring expander should be used to mount the rings on the pistons. This will minimize the risk of breaking or twisting the rings. A ring compressor will be needed to install the pistons in the block.
Cylinder bores must also be properly reconditioned when the rings are replaced, which means honing the bores or using a glaze breaker according to the ring manufacturer recommendations. The finish and crosshatch in the cylinder bores must match the requirements of the rings that are used (moly requires a smoother finish than chrome or plain cast iron). The cylinders must also be cleaned after honing or deglazing (scrubbing with soapy water works best) prior to engine reassembly. A light coat of oil is needed to lubricate the new rings.
Pistons may have to be replaced if worn or damaged, or if the cylinders are bored to oversize to compensate for wear. The type of replacement pistons that will be needed will depend on the engine's compression ratio, the size of the bores (standard or oversize) and how the engine will be used (normal service or severe service). Maintaining the stock compression ratio is the best advice because too much compression can lead to engine damaging detonation. Some engines today have compression ratios of up to 10:1, which is possible with EFI and computerized engine controls. But for older engines, compression should be limited to 9:1.
Most stock pistons are made of cast aluminum, but stronger hypereutectic pistons are used in many late model engines. Hypereutectic pistons are made of an aluminum alloy that contains a higher amount of silicon than ordinary cast pistons. Silicon improves hardness and wear resistance. For performance applications and diesels, forged pistons are usually required.
Another wear component in the block is the cam drive, be it a set of gears or a timing chain. Chains stretch with age, which retards valve and ignition timing to adversely affect engine performance. If the chain jumps one ore more teeth, it may be hard to start or run poorly. If it breaks, the engine won't run at all and may suffer valve damage if there is insufficient valve-to-piston clearance for the engine to freewheel. Timing gears with nylon coated teeth may become brittle with age and disintegrate.
Timing chains are always sold with new gears because both wear out. But something you may need that is not included with a timing chain and gear set is a new front seal for the crankshaft, and/or a key for the crankshaft sprocket. Offset keys are also available for fine tuning cam timing.
On overhead cam engines with a rubber timing belt, the recommended replacement interval is 60,000 miles. Many people don't know this or put it off too long with disastrous results. A broken timing belt can cause bent valves if the pistons hit the valves. So always replace the timing belt in a high mileage engine.
Moving on to the cam and lifters, failures here are fairly common, too. Sometimes a cam will wipe out a lobe because of a lubrication problem. The result is a dead cylinder because the affected valve is not opening. Cams can also break or seize, as is the case in many overhead cam engines that lose their coolant and overheat. If an Overhead cam head warps, it may bend, break or seize the cam.
If you want to install a "hotter" cam (higher lift & more duration for more power), do not make the mistake of "overcamming" the engine. Always follow the cam manufacturers recommendations. Increasing lift and duration too much in an attempt to up the horsepower may create driveability problems by moving the engine's power curve too far up the rpm scale. The stock fuel system, heads and valves may also not be able to handle the hotter cam, so these parts too may need to be replaced or modified with performance parts.
Regardless of what type of replacement cam is installed, all pushrod cams (except those with roller lifters) should be installed with new lifters. Reusing old flat bottom lifters can wipe out the lobes on a new cam. The lobes must also be coated with assembly lube to protect the cam during the critical engine break-in period.
New valve springs are also recommended for a new cam, particularly a performance cam. Weak valve springs can allow valve float at higher rpms, limiting the power potential of the engine. Any valve spring that does not meet specs (height or pressure) should be replaced.
If an engine needs valve work, it is usually because of low compression. As an engine accumulates mileage, the valves and seats wear. This can lead to compression leaks as well as valve overheating that causes exhaust valves to burn. The engine may also be using oil because the valve guides are worn. Oil being sucked down the guides can foul spark plugs and create heavy carbon deposits on the backs of intake valves and inside combustion chambers.
When a head is given a valve job, the valves and seats are refaced to restore a tight seal. Individual valves may have to be replaced if the stems are badly worn, the face is too thin or there is any damage. Exhaust valves are sometimes replaced regardless of their condition to minimize the risk of future problems such as breakage or burning. If seats cannot be refaced due to wear or damage, replacement is necessary.
Valve guides usually have to be replaced or reconditioned because they are usually worn in high mileage engines. Options here include pressing out the old guides and installing new ones in heads that have replaceable guides (cast iron or bronze), reaming the old guides to oversize to accept new valves or ones with replated stems (used primarily on heads with integral guides), relining the old guides with bronze liners, or knurling.
Other engine parts that may be needed include a new oil pump (always recommended for high mileage engines), a new oil pressure sending unit, a new thermostat, oil, oil filter, antifreeze, gaskets and fasteners. Head bolts that are the torque-to-yield type should not be reused because they stretch when tightened and may break if reused.
The motor mounts should also be checked to make sure they are in good condition when any engine work is done. The mounts support the engine and transmission or transaxle, and help dampen noise and vibration to isolate the powertrain from the rest of the vehicle. The mounts also maintain engine alignment in front-wheel drive cars and minivans with transverse-mounted engines. A loose or broken mount can allow engine movement, misalignment and noise.
More Engine Repair Articles: Engine Repair (Cylinder Block, Pistons & Crankshaft) Articles: Click Here to See More Carley Automotive Technical Articles