 More Brake Articles:
A brake job should always include a thorough inspection of the entire brake system, including the condition of the brake fluid and hydraulic components such as the master cylinder, calipers, wheel cylinder, brake hoses and lines. Any parts that no longer meet minimum service specifications, are damaged, severely corroded or leaking should be replaced. Parts that are nearing the end of their useful service life may also be replaced for preventive maintenance and to prolong the life of the brake system.
The most common mistake do-it-yourselfers make when replacing disc brake pads is to just replace the pads. Rotors do not have to be resurfaced or replaced as long as they are in relatively good condition, reasonably smooth, flat and are not worn too thin. But some people just slap in a new set of pads regardless of the condition the rotors and call it a brake job. This approach is NOT recommended!
Good brakes are absolutely essential for safe driving, so anything in your brake system is worn out, leaking, making noise or causing a braking problem, you need to inspect the entire system time to determine what needs to be replaced. The goal is to restore your brake system to like-new condition.
Many late model cars, SUVs and trucks are equipped with antilock brake systems that can precharge the brakes in anticipation of braking (to reduce braking reaction time), or actually apply the brakes automatically as a function of the collision prevention system (automatic braking).
CAUTION: If you are doing any type of brake work on these vehicles, the brake system MUST BE DEACTIVATED before you work on the brakes, otherwise the system may energize the brakes unexpectedly causing the caliper pistons to push outward with considerable force. This could pinch your fingers if they are between the pads and rotors. If the pads have been removed, the pistons can blow out of their calipers. This can happen even when the ignition and engine are off!
The antilock brake system can be deactivated by locating and removing the main power fuse for the ABS system, or by using a scan tool to temporarily deactivate the system. Disconnecting the battery also works, but this may cause loss of certain memory settings in various vehicle modules. See Battery Disconnect Cautions & Problems for more information on this subject.
When to Replace Your Disc Brake Pads. Brake pads should be replaced when they are worn down to minimum thickness specifications, or the wear indicators are scraping against the rotors.

Measure the Pads Minimum pad thickness specifications will vary depending on the vehicle and application. For some vehicles, it may be as thin as a couple of millimeters. For others, the vehicle manufacturer may specify a minimum thickness of 1/8 inch or more. The point is, the pads need to be replaced when they are getting dangerously thin. You do not want to wear the pads all the way down to the metal backing plates as this will damage the rotors and provide little braking friction. There is also a risk that heavily worn pads may crack, break loose or separate from their backing plates, causing a loss of braking.
Pads should also be replaced if a leaky caliper has contaminated them with brake fluid. New pads are also required if the pads have been contaminated with grease or oil.
Pads should be replaced in sets, and with the same type of friction material (or better) than the original pads.
Another reason for replacing brake pads is to upgrade brake performance or to reduce brake noise. Original equipment pads are fine for everyday driving, but you may want to install higher temperature performance pads if you are driving aggressively or plan to take your vehicle to the track. Some types of brake pads may also be noisy or unusually dusty. Replacing the original pads with ones that offer quieter braking and/or less dusting may be an upgrade you might want to consider. See Ceramic Brake Pads for more information about the benefits of ceramic pads.
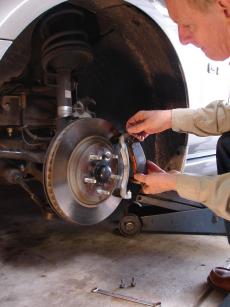
The pads are replaced by unbolting the calipers, rotating the calipers out away from the rotors and removing the pads from their mounts. Pads may be secured by anti-rattle clips or springs. These parts should be replaced if broken, damaged or badly corroded. Do not discard or leave these parts out because they help dampen the pads to reduce noise and vibration. See How To Replace Brake Pads for more information.
Watch Out for Rust and Corrosion. External rust on caliper slides, bushings and pins can prevent a "floating" caliper from centering itself over the rotor. This can cause uneven pad wear and uneven braking (a pull to one side). Internal corrosion in calipers, wheel cylinders and the master cylinder can pit the bore surface, damage the piston seals and cause these parts to leak. Internal corrosion can also reduce piston bore clearances, causing the piston to stick (a common cause of a "stuck" caliper that won't release the brake). Uneven pad wear between the inner and outer pads is usually a clue that the caliper is not sliding.
New disc brake hardware is recommended for high mileage vehicles, or those with badly corroded hardware.
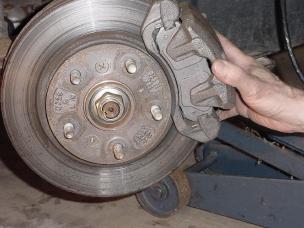
Inspect the Rotors and Calipers. Rotors and calipers should be inspected for physical damage such as cracks, severe corrosion or damage that would affect their operation. Also, if a caliper is leaking brake fluid, it must be rebuilt or replaced. Do not take any chances here because a fluid leak can result in brake failure!
Rotors sometimes develop "hard spots" that cause the rotors to wear unevenly. This usually leads to variations in rotor thickness that can make the brake pedal pulsate when the brakes are applied. Hard spots can often be seen as dark, discolored or blue-colored patches on the rotor surface. Resurfacing can restore rotor flatness, but hard spots usually return. The best repair is to replace the rotors.
Some minor surface cracking on rotors is normal, but deep cracks can weaken a rotor and lead to rotor failure. Cracked rotors should always be replaced.
Cracks in the caliper housing can be dangerous, so a cracked caliper should be replaced. The same goes for any caliper that is leaking brake fluid. High mileage calipers should also be replaced or rebuilt because the seals become hard and brittle.
Measure Rotor Thickness and Trueness. Rotors have minimum thickness and machine to specifications (usually cast or stamped on the rotor), so the thickness of the rotors should be measured with a micrometer to see if your rotors need to be replaced. If no specifications are visible on the rotor, look up the rotor specifications for the vehicle in a service manual or online. Many auto parts stores have minimum thickness information with their rotor product listings.
Thickness variations due to hard spots or uneven wear, or too much lateral (sideways) runout in a rotor can cause pedal pulsations when braking. Measuring rotor thickness variations with a micrometer is tricky, so if your brakes have a noticeable pedal pulsation, you can usually assume the rotors are not running true and need to be replaced.
Though few motorists own a dial indicator or know how to use one, measuring lateral rotor runout can reveal problems that cause brake pedal pulsations and uneven rotor wear. Lateral rotor runout can be measured by placing a dial indicator against the surface of the rotor and turning it one full revolution. The maximum amount of runout that is acceptable will vary somewhat from one vehicle to another, but most should have no more than .003 to .005 inches of runout. Excessive runout can be caused by runout in the hub, dirt or corrosion between the rotor and hub, or runout in the rotor itself (as a result of wear or incorrect machining).
NOTE: If you are replacing your old rotors with new ones, the new rotors should be ready to install out of the box. Resurfacing new rotors should NOT be necessary and is NOT recommended because it shortens rotor life and may create runout or finish problems if not done correctly.
Rotor Removal Tip: Many vehicles, especially Asian & European, use large Phillips head screws to attach the rotor to the hub. These screws can be very difficult to remove once they become rusty. The best tool to use for their removal is not an air wrench, but an inexpensive 3/8 impact driver with a properly fitting screwdriver bit. Hammering on the driver not only turns the screw, but the vibration breaks the rust loose, allowing the screws to be removed without damage.

Rotor Installation Tip: The face of the hub where the rotor mounts commonly develops rust. This rust should be removed with a sanding disk or brush, as well as any rust on the matching face of the rotor. If any rust or debris ends up between the rotor and hub, it can cause runout that will lead to uneven wear and pedal pulsations.
Change Your Brake Fluid. Brake fluid is hygroscopic and absorbs moisture over time. Moisture contamination raises the boiling temperature of the fluid, which increases the risk of fluid boil and pedal fade with prolonged hard braking or during ABS stops. Moisture also causes the corrosion inhibitors in the fluid to break down, which eventually leads to corrosion inside the calipers, wheel cylinders, steel brake lines and master cylinder.
Brake fluid that is badly discolored or contains visible sediment needs to be replaced. But many times old, worn-out brake fluid doesn't look that bad. So the condition of the fluid should always be tested with a refractometer, chemical test strips or an electronic brake fluid tester. If the fluid contains more than 3 percent moisture, it should be changed.
Changing the brake fluid every 30,000 to 40,000 miles for preventive maintenance is always a good idea. The fluid should always be changed when the brake linings are replaced. Use the type of brake fluid (DOT 3 or DOT 4) that was in the system before your changed it. The fluid specification is usually marked on the master brake cylinder reservoir.

Inspect all Brake Lines and Hoses. Inspect the condition of the brake hoses and lines. If a hose or line is leaking, replace it. Do not attempt to patch a leaky hose or line because the patch will not hold. The brakes can generate hundreds of pounds of internal pressure when the brakes are applied, so tape, solder or anything you have wrapped around a leaky hose or line will likely fail.
NOTE: If one brake hose on a high mileage vehicle has failed, you should replace ALL of the rubber brake hoses. They are all the same age and are probably in the same poor condition. A hose failure is bad news because it will cause your brakes to fail (at least half of your brake system because the system is split into two separate hydraulic circuits). Failure on one brake circuit should still leave two brakes operational, but they may not provide enough stopping power to bring your vehicle to a halt in a safe distance.

If a steel brake line has rusted through and is leaking, it can be replaced or spliced. Brake lines must be approved steel tubing (never copper tubing which is too soft) with double flared or ISO end fittings. As with aging brake hoses, it might be wise to replace ALL of the steel lines at the same time in a high mileage vehicle that has a lot of rust underneath to reduce the risk of a repeat failure down the road.
CAUTION: Always bleed all of the brake lines after replacing a brake hose or line or any other hydraulic components in the brake system. This is necessary to remove air from the system. If all of the air is not removed by bleeding, the result can be increased brake pedal travel or a soft brake pedal. Follow the recommended bleeding sequence and procedure for your vehicle, which may require using a scan tool on some vehicles with ABS to cycle the ABS solenoids.
WARNING: Always pump the brake pedal several times after bleeding the brakes or replacing brake pads, and before driving your vehicle. Pump the pedal until it feels firm to take up the slack between the pads and rotors. This will make sure your brakes are working and will hold when you apply them.
Don't Overlook Your Parking Brake. The parking brake is probably the most under utilized and overlooked component in the brake system. Many people never use the parking brake and rely instead on the transmission to keep the vehicle from moving when they park it. Lack of use can allow the parking brake cables and mechanisms to rust and stick in place, which may prevent the parking brake from applying or releasing properly. Replace any cables that are badly corroded, broken or missing.
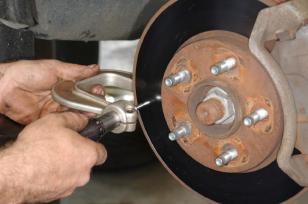
Check your wheel Bearings. With the wheels raised off the ground, rotate each wheel by hand while feeling for roughness and listening for any unusual noise. Grasp the wheel at the 12 and 6 o'clock positions and try to rock the wheel back and forth. If you feel any movement, the wheel bearings may be worn or loose.
Most wheel bearings on late model vehicles are sealed and non-adjustable, so if they are loose they need to be replaced.
On most older vehicles from the early 1980s and back, the wheel bearings are usually adjustable. They can be disassembled, cleaned, inspected, repacked with grease and adjusted. Most are adjusted to allow just a slight amount of play, but some are set to zero play or a slight preload. Look up the specifics for your vehicle in a service manual or online so you follow the correct adjustment procedure.
Remount the Wheels When you put the wheels back on, tighten the lug nuts in a star pattern to assure even loading of the wheel against the hub, and use a torque wrench to final tighten the lug nuts to specifications. Typical lug nut torque specs are around 80 to 90 ft. lbs. for most small to medium sized passenger cars with 4 and 5 lug wheels, 100 ft.lbs. for large cars, 110 to 150 ft. lbs for fullsize pickup trucks and SUVs with 6 to 8 lug wheels.
Check the Brake and ABS Warning Lights. The lights should illuminate for a bulb check when the ignition is turned on, then go out after a few seconds and remain off when the vehicle is started.
If the red BRAKE warning light is on (and not because the parking brake was accidentally left on), your vehicle may be unsafe to drive. The warning light means the brake system has lost hydraulic pressure in one of its brake circuits, or the brake fluid level is dangerously low. The fluid level in the master cylinder reservoir should be checked, and if it low, the entire brake system should be carefully inspected to find any leaks.
If the amber ABS warning light is on, it indicates a fault in the ABS system. When this warning light comes on, the ABS system sets a diagnostic trouble code that corresponds to the fault and goes into standby mode. Normal braking should be unaffected, but the ABS system will not engage if ABS is needed in an emergency or when braking on a slick surface. To diagnose the problem, you will need a scan tool that can read ABS codes (a basic scan tool that reads powertrain codes usually cannot access ABS codes). Once the code has been read, further diagnosis may be required to figure out what the problem is and what needs to be replaced.
More Brake Articles: Click Here to See More Carley Automotive Technical Articles