 More Head Gasket Articles:

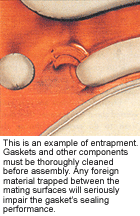
The head gasket seals the engine's combustion chambers as well as the coolant and oil passages between the head and block. The head gasket has to provide a leak-free seal from the moment it is first installed, and maintain that seal for the life of the engine, which might well be 150,000 miles or more on many of today's engines.
When a head gasket fails, there is usually a reason why. The most common cause of head gasket failure is usually overheating, often as a result of a coolant leak, a bad thermostat or cooling fan failure. Even so, the causes for head gasket failure can usually be lumped into three categories:
Bimetal Stress
One factor that makes many engines hard to seal today is the use of aluminum cylinder heads on cast iron blocks. Aluminum heads save weight but expand 1.7 times faster than cast iron when they get hot. The difference in expansion rates creates a lot of motion and scrubbing between the head and block. If the head gasket cannot handle this motion and is not strong enough to withstand the shearing forces that occur every time the engine is started, run and allowed to cool back down, it will eventually leak.
Examples bimetal stress causing a head gasket failure include the OEM head gaskets in the Dodge Neon 2.2L, Ford 3.8L V6 and Toyota 3.0L and 3.4L V6 engines. Going further back, we all remember the problems GM had with the 2.3L Quad Four head gaskets. All of these engines have experienced a high rate of premature failure because the OEM head gasket could not keep a seal. Fortunately, the aftermarket developed replacement gaskets for all of these applications that solved the original problem.
If the surface finish on a bimetal engine head and block is too rough and digs into the gasket too deeply, it can literally tear the gasket apart over time. That is why surface finish is so important on today's engines.
For bimetal engines with composition gaskets, the recommended surface finish is 20 to 50 RA. This compares to 60 to 120 RA for cast iron engines with the same type of gaskets.

Equally important is the design of the head gasket itself. One way gasket manufacturers deal with the scrubbing problem in bimetal engines is to add a nonstick coating to the gasket. Teflon, molybdenum and similar low friction coatings prevent gaskets from sticking to either surface. This allows the head to expand and contract without ripping the gasket apart.
This is the opposite approach to what is done with many head gaskets for cast iron engines. On these applications, the rate of thermal expansion for the head and block is the same so there is much less movement and scrubbing at the gasket surface.
Raised silicone, Viton or fluoroelastomer sealing beads are often applied to the face of the gasket to increase the clamping pressure in critical areas. This improves the gasket's ability to form a good cold seal when it is first installed, and helps it maintain that seal by holding the gasket firmly in place.
On many late model engines, graphite head gaskets are used because graphite has natural lubricity that can handle the differences in expansion between aluminum heads and cast iron blocks. Graphite is a relatively soft material that provides good conformability for cold sealing the engine, and it can withstand high temperatures and draw heat away from hot spots to reduce thermal stress and loading.
Hot spots tend to form in areas where exhaust ports are located next to each other. Heat buildup in these areas makes the head swell. This can crush the gasket between the cylinder bores causing the gasket to leak and fail. To prevent this from happening, gasket manufacturers may use a gasket material such as graphite to dissipate heat away from the hot spot and/or reinforce the most highly stressed areas of the gasket with a shim so it will not crush.
Head gasket durability can also be improved by using stronger or reinforced combustion armor, tougher, high temperature fibers such as aramid and Kevlar in composition gaskets, and adding extra reinforcements to critical oil hole grommets.
Multi-Layer Steel Head Gaskets
An increasing number of OEMs have turned to
"Multi-Layer Steel" (MLS) head gaskets to provide improved durability. MLS
gaskets, which are found on Ford, Chrysler and many Japanese engines,
typically have three to seven layers of steel. The outer layers are
usually stainless spring steel and embossed. The inner layers provide
added support and thickness.
The embossed multi-layer construction reduces the load on the head bolts, which in turn reduces bore distortion for less blowby and lower emissions. The outer layers of steel are coated with a thin layer (.001˝ to .0015˝) of nitrile rubber or Viton to improve cold sealing.
MLS head gaskets are very durable because their solid steel construction retains torque very well and does not take a compression set like composition gaskets. But the rigid nature of MLS gaskets also means they have very little conformability. That is why MLS gaskets require an extremely smooth, flat surface finish on both mating surfaces (typically 20 to 30 RA or less).
Reproducing the kind of high quality surface finish needed to seal MLS gaskets requires up-to-date milling equipment and precision resurfacing techniques. Even then, it may be difficult to get a good cold seal on some engines. One alternative here is to install a conventional gasket (graphite or composition) that does not require such a smooth finish (if such an alternative gasket is available for the application). Several gasket manufacturers have conventional replacement gaskets for the Ford 4.6L as well as other applications.
Aftermarket gasket manufacturers are also using MLS technology to introduce more durable replacement gaskets for certain problem engines that came originally equipped with conventional head gaskets. These include the 2.0L Dodge Neon engine and the Toyota 5VZFE 3.4L V6 truck engine. The aftermarket MLS replacement gaskets for both of these applications have a thicker surface coating and can handle a more traditional surface finish of 60 to 70 RA.

Head Gasket Installation Issues
Fastener problems are probably the number one cause of installation-related gasket failures. No gasket is going to seal well if you use the wrong procedure to tighten the head bolts. Make sure the torque specifications you are using are the latest, up-to-date numbers.
Make sure all of the head bolts are in good condition, free from nicks or corrosion and are not stretched. Torque-to-yield (TTY) head bolts should not be reused. Also, bolt threads should be clean and properly lubricated.
Many people never check the accuracy of their torque wrenches. Beam and gauge type wrenches are less likely to get out of calibration than the adjustable dial type, but all torque wrenches should be checked for accuracy every year or two.
Improper surface finish is probably the second most common reason for gasket failures. This includes surfaces that are too rough and surfaces that are not flat.
Another installer error is using a sealer on a coated composition head gasket. Some sealers will react with the gasket coating and turn it into goo. If a head gasket requires sealer, it will usually come with the gasket.
Never use a Scotchbrite abrasive pad to whiz off old gasket residue from a head or block. Abrasives can leave low spots on the surface that will prevent the head gasket from sealing.
Some general suggestions for head bolts include:
1) Inspect all head bolts to make sure they are in perfect condition with clean, undamaged threads. Dirty or damaged threads can give false torque readings as well as decrease a bolt's clamping force by as much as 50%! Bolt threads should be wire brushed, then inspected. Replace any that are nicked, deformed or worn.
2) Dirty or deformed hole threads in the engine block can reduce clamping force the same as dirty or damaged threads on the bolts. Run a bottoming tap down each bolt hole in the block. The tops of the holes should be chamfered so the uppermost threads won't pull above the deck surface when the bolts are tightened. Clean all holes to remove any debris.
3) To be absolutely safe, do NOT reuse TTY head bolts. TTY bolts stretch slightly when installed, so there is a risk of breakage if the bolts are reused. Some TTY applications include Ford Escort 1.6L and 1.9L engines, Chrysler 2.2L and 2.5L, and GM 1.8L, 2.0L and 2.5L fours, 3.0L V6 and 381 V8 diesel engines, and the LS1 family of V8s.
4) Check bolt lengths. Make sure bolt lengths are correct for each hole location (some holes require longer or shorter bolts than others). Bolts should also be measured or compared to one another to check for stretch. Any bolt that is visibly longer than its companions should be replaced.
5) Use hardened steel washers under head bolts in aluminum heads to prevent galling and help distribute the load. Position the washers so their rounded or chamfered side faces up.
6) If the head has been resurfaced, check bolt lengths to make sure they do not bottom out in blind holes. A bolt that bottoms out will apply little or no clamping force on the head which may allow the gasket to leak. To compensate for resurfacing, you may have to install hardened steel washers under the bolts to raise them up, or use a head gasket shim to restore proper head height.
7) Lubricate bolt threads as well as the underside of the bolt head with 30 weight engine oil (not assembly lube or grease) when the engine is assembled. Use a flexible sealer on any bolt threads that extend into a cooling jacket.
8) If a gasket requires retorquing after initial installation, run the engine until it reaches normal operating temperature (usually 10 to 15 minutes), then shut it off. Retighten each head bolt in the same sequence as before while the engine is still warm. If the engine has an aluminum cylinder head or block, however, do not retorque the head bolts until the engine has cooled back down to room temperature.
On some applications with retorque style head gaskets, it may be necessary to retorque the head a third time after a specified time or mileage interval due to the design of the engine. Follow the vehicle manufacturer recommendations.


Operational Issues That Cause Head Gasket Failures
Regardless of what type of head gasket is used or how carefully it is installed, some operating conditions can cause even the best head gasket to fail. Preignition/detonation is probably the most common cause of head gasket failures today.
The engine's tune has to be correct (proper fuel mixture and spark timing) to minimize the risk of preignition or detonation. If the cylinder heas has been resurfaced or milled, it may be necessary to install a copper or steel shim under the head gasket to prevent excessive compression that could cause detonation.
The second most common cause of head gasket failure is overheating. The cooling system on many late model vehicles is just adequate, so over time it may not take much to cause the engine to run hot and stress the head gasket. If a head gasket has failed because of overheating, check the radiator, thermostat, water pump, cooling fan, EGR system and so on to determine why your engine got too hot.
Poor surface finish can also be a contributing factor to head gasket failure. Aluminum cylinder heads that have exhaust valves next to each other (such as the Chrysler 2.2L and Honda 1.3L and 1.5L) are vulnerable to localized overheating in the area between adjacent exhaust valves. This is typical of head designs that restrict or limit coolant flow and circulation in critical areas. Some engine blocks with siamesed cylinders also provide minimal cooling between the cylinder bores. Even engines like small block Chevy V8s that have adjacent exhaust valves in the two center cylinders can experience hot spots if the engine overheats or experiences preignition or detonation.
Some engines are prone to hot spots no matter what you do, so there is no way to eliminate the hot spot. For these engines, an aftermarket gasket that is been specially designed to solve the hot spot problem may be needed to prevent repeat failures.
For example, Fel-Pro redesigned its Honda 1.3L and 1.5L gasket to eliminate hot spot failures by adding a special Y-shaped shim between the two center cylinders. The shim is pressed into the underlying gasket material to improve the gasket's resistance to crushing.
Diagnosing Gasket Failures
Figuring out why a head gasket failed is the first step to preventing repeat failures. Sometimes the cause is obvious and sometimes it is not.
One of the causes of overheating, for example, is a dirty cooling system. As little as 1/8 inch of calcium deposits in a radiator may reduce cooling efficiency by 40%. It is also important to use the correct type of coolant and the proper mixture (50/50 is usually recommended for year-round driving).
"High temperature" replacement head gaskets are often a good solution for applications where a head gasket has failed due to detonation. These gaskets can provide additional sealing strength through the use of stainless steel fire rings and may include special beading and facings, often graphite. The gaskets will also lower compression radio slightly because they are slightly thicker than a stock gasket.
A head gasket that failed because of overheating or a hot spot will be crushed and measurably thinner in the damaged area when checked with a micrometer. By comparison, a gasket that has failed due to detonation or preignition will usually have cracked armor around the combustion chamber which leads to burn-through.
The corresponding surface areas on both the head and engine deck where the gasket failed should be inspected for damage (erosion, pitting or cracks) as well as flatness. If either surface is damaged or is not flat, the head and/or engine block must be resurfaced otherwise the new head gasket may not seal properly.
While the head is off the engine, check the flatness of both the head and block. Use a straight edge and feeler gauges to check all critical areas, especially those between the cylinders. Flatness specifications vary depending on the application, but on most pushrod engines with cast iron heads, up to .003˝ (0.076 mm) out-of-flat lengthwise in V6 heads, .004˝ (0.102 mm) in four cylinder or V8 heads, and .006; (0.152 mm) in straight six cylinder heads is considered acceptable. Aluminum heads, on the other hand, should have no more than .002˝ (.05 mm) out-of-flat in any direction.
More Head Gasket Articles: Click Here to See More Automotive Technical Articles
