 More Cooling System Articles:
Have you had a heater core fail, then replaced it only to see it fail again within a year or less? Or have you had a radiator fail from the inside out due to corrosion or pitting? These may be symptoms of cooling system electrolysis corrosion.
Electrolysis corrosion seems to be a common problem on some late model vehicles that have aluminum heater cores and radiators. Electrolysis is a chemical reaction that takes place between the coolant and metal surfaces. In the case of an automotive cooling system, the most vulnerable metal is aluminum, especially if the engine has an iron block. Aluminum is softer than iron, and is more reactive to both acids in the coolant and electric currents in the coolant.
If the corrosion inhibitors in the coolant are worn out because the coolant has not been changed in years, or because stray electrical currents are flowing through the coolant because of missing, loose or corroded engine ground straps, electrolysis can eat away at the heater core, radiator and any other aluminum parts in the system (including the water pump and passageways in aluminum intake manifolds and cylinder heads).
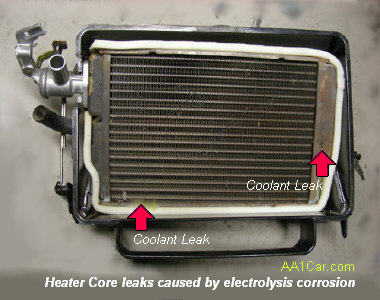
* Coolant leaking from the heater core, and the appearance of small black pinholes anywhere on the heater core. Coolant leaking from the heater core will usually leave drips, wet spots or stains on the carpet on the passenger side of the vehicle. Steam or a greasy vapor may also be seen coming from the A/C and heater vents in the dash when the heater or defroster is on. The gradual loss coolant will cause the coolant level to become low, and the engine to eventually overheat.
* Coolant leaking from the radiator, with the appearance of small black pinholes on the metal parts of the radiator. As with the heater core, electrolysis corrosion has eaten through the metal from the inside out.
* Coolant leaks at intake manifold gasket connections. This type of leak is often due to a softening of the plastic carrier and seals on certain intake manifold gaskets that occurs over time, but it may also be caused by corrosion eating away at the coolant ports in the cylinder heads and intake manifold. If enough metal erodes away, the intake manifold gasket may no longer be adequately supported and allow coolant to seep past the seal. Replacing the intake manifold gasket won't necessarily fix the leak unless the replacement gasket has a wider sealing area with multiple sealing beads (which some aftermarket gaskets do). The eroded areas around the ports may have to be repaired with a high temperature metal-filled epoxy, then sanded flat and smooth before the gasket will seal properly.
In some cases, a heater core will fail from the inside out due to erosion rather than electrolysis. Erosion is a physical wearing away of the metal caused by dirt, grit and sediment circulating in the coolant. The heater core is most vulnerable to dirty coolant because the tubes in the core have sharp bends. As the contaminants circulate with the coolant, they wear away at the inner surface of the tubes until eventually the metal perforates and springs a leak. The same thing can happen to the plastic end tanks on an aluminum/plastic radiator, or the plastic impeller inside some water pumps. Any junk in the coolant will have an abrasive effect and wear away the softest material it comes into contact with, be it plastic or aluminum.
Radiator and heater hoses can also fail from the inside out due to electrolysis corrosion. Rubber is normally non-conductive so you would think this would be impossible. But the coolant can react electrochemically with the synthetic rubber, causing it to degenerate, pit, crack and eventually fail. If you cut open a hose that has failed because of electrolysis, the inside will usually have fissures, cracks and pits created by the electrochemical attack.
Cooling system electrolysis corrosion can be caused by two things:
Worn out coolant. This is usually the result of not changing
your coolant often enough. Over time, the corrosion inhibitors in every type of coolant
wear out. For traditional green formula coolants, this can occur after two or three
years or 30,000 to 50,000 miles. With "long life" OAT and HOAT formula coolants, the corrosion
inhibitors may no longer be able to protect your cooling system after five years or
100,000 miles, which ever comes first (not last!). Once your coolant turns from alkaline to
acidic, electrolysis starts to eat away at the metal surfaces inside your cooling
system. Sooner or later your cooling system will start to leak.
Stray electrical currents in the coolant. Worn out coolant is more electrically
conductive than good coolant. Also, the coolant can serve as an alternate path to ground
for your vehicle's charging system and electrical system if there is not a good ground
connection between the engine, charging system and body (chassis). Loose, corroded, broken
or missing ground straps between the engine and chassis are a common cause of this type
of electrolysis corrosion.
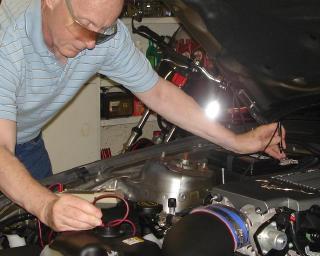
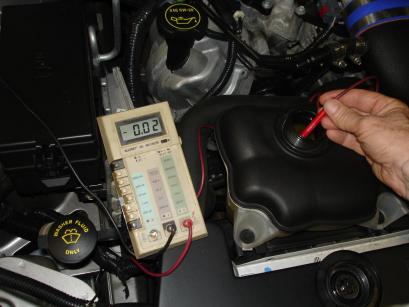
With the engine running and at normal operating temperature, use a digital voltmeter to check for voltage between the coolant and the battery negative (-) cable. Carefully remove the radiator cap or coolant reservoir cap (use a rag and open slowly as the system will be under pressure and hot steam may blow out of the opening). Insert the positive (+) voltmeter lead in the coolant, and touch the negative (-) voltmeter lead to the battery negative post. If you see a zero reading, that's good because it means there is no stray electrical current flowing through the coolant. But if you see a reading of 0.300 volts (300 millivolts) or higher, you've got electrolysis and potential trouble.
You can check the condition (reserve alkalinity) of the antifreeze in your cooling system with chemical test strips that change color when dipped in the coolant. These test strips are available at most auto parts stores. If the test strip shows the coolant is acidic (bad), or is borderline, you need to change your coolant now!

If it has been more than five years since you've changed your coolant, drain and flush your cooling system, then refill it with a 50/50 mixture of fresh long life coolant and distilled water. Do NOT use ordinary tap water or softened water because tap water can contain dissolved minerals and soften water contains salts that are corrosive and will shorten the life of the corrosion inhibitors in the coolant. Better yet, refill the system with pre-mixed antifreeze that already contains distilled water and is mixed in the correct proportions.
If your old coolant shows signs of neglect (sediment, scum or severe discoloration), flush
your cooling system with a chemical cleaner product. Typically, you add the product to
the radiator or coolant reservoir, run the engine until it is warm (so the thermostat is
open and the coolant is circulating in the system), turn on the heater (so the cleaner will
circulate through the heater core, too), then drive your vehicle for about 10 minutes or so
to loosen all the crud and sediment inside the system. Then you shut off the engine, let
everything cool, and drain the radiator.
Follow the directions on the product to the letter and make sure you thoroughly flush the system
afterward with several gallons of clean, distilled water. This is necessary to remove all
traces of the chemical and sediment from the system. Continue flushing until you see nothing
but clean water coming out of the radiator drain valve.
Check the engine ground straps and make sure they are tight and in good condition. If in doubt, remove and clean the ground strap connections, then reinstall and tighten to make sure there is good electrical contact. Also check any ground straps on the alternator, and the battery cables (both ends).
In some cases, stray electrical currents can find their way into the cooling system if aftermarket electrical accessories such as a stereo, CD player, lights, etc. are not properly grounded to the chassis.
More Cooling System Articles:  Click Here to See More Carley Automotive Technical Articles
