
Home,
Auto Repair Library, Auto Parts,
Accessories, Tools,
Manuals & Books, Car BLOG,
Links, Index

Heater Repair
Copyright AA1Car.com
Nothing is more annoying than a heater that blows cold air, except maybe one that leaks. So if you're dealing with a heater problem, be it a leaker or one that doesn't seem to put out much warmth, keep reading because this article can help you solve your heater blues.
Before we get into troubleshooting heater problems, let's talk about the heater itself. The heater core is like a mini-radiator. It has inlet and outlet pipes and a finned copper or aluminum core through which hot coolant from the engine circulates. The heater core is located inside the HVAC plenum under the dash and usually on the passenger's side of the box.
When hot coolant from the engine flows through the heater core, the core gets hot and heats the air that's forced through it by the blower motor. Generally speaking, a heater should put out air that's at least 70 degrees hotter than the outside temperature. So if it's 30 degrees outside, your heater should put out at least 100 degrees F.
The hot coolant flows from the engine to the heater core through the "inlet" hose. After circulating through the core, the coolant returns to the water pump through the "outlet" or "return" hose. Both the inlet and outlet return hoses should feel hot when the engine is at normal operating temperature and the heater is on.
In the inlet hose you may find a "heater control valve" that blocks the flow of coolant to the heater when the heater isn't needed (when running your air conditioner on maximum, for example). Some older heater control valves are cable or vacuum operated, but most of the newer ones (when used) are electronic.
Most heater control valves are open all the time unless vacuum or power is applied. This means hot coolant circulates through the heater core even when the heater is not being used. This is done for several reasons. One is safety. In the event the heater valve fails (doesn't close when vacuum is applied) you still have heat to defrost the windows for safe cold-weather driving.
Some heater control valves are "thermostatically controlled" with a capillary tube that extends into the heater air outlet. The capillary tube reacts to changes in the heater's output. This regulates the opening and closing of the control valve to maintain a more consistent level of heater performance.
Another method of regulating the heater's output is to control air flow through it. This is done two ways: by changing the blower speed and by opening and changing the position of the "blend doors" that route air through the heater core and A/C evaporator inside the HVAC housing.
On vehicles without factory air conditioning, sliding the heat selector control switch to the off position closes a door that blocks the flow of air into the heater core. Even if the blower is turned on, no heat will come out because the air inlet is closed. On vehicles with factory air conditioning, a second "blend" door is usually used to route some air through the heater core and some through the A/C evaporator, depending on the temperature range selected. Sliding or tuning the temperature range knob all the way to the cold position closes the blend door so all air is routed around the heater core and through the A/C for maximum cooling. Sliding or turning the temperature knob to a midway position between hot and cold opens the blend door so warm air is mixed with cold to take the chill off the A/C. A third air control door is used to reroute air to the defrosters.
On vehicles with automatic temperature control (ATC) systems, the ATC module figures out the best door positions and positions them accordingly to deliver heat or cooling. If the vehicle has a dual-zone system, there may be a separate heater core for each side. Or, the ATC system may use additional blend doors to route different amounts of heating or cooling to each side.
The blower motor, which blows air through both the heater and air conditioner on vehicles with factory A/C, is wired to a "resistor unit" (usually mounted on the outside of the heater box or plenum) to reduce circuit voltage so the motor will run at the desired speed. Power to the motor may be supplied through a separate relay hidden somewhere under the dash.
Heater Blower Not Working
If the blower motor doesn't work (no sound), it probably means the motor is bad and needs to be replaced unless debris has jammed the blower fan or there is an electrical fault such as a blown fuse, bad relay, switch or resistor, or loose wire. A faulty automatic temperature control module may also prevent the blower from running (A/C too).
A blown fuse, by the way, is a symptom not a cause. A blown heater fuse means the circuit overloaded for some reason. Replace the fuse with one of the same amp capacity (never one with a higher rating because doing so may allow the wires to get dangerously hot). If the new fuse blows as soon as the blower is turned on, you've confirmed an electrical short circuit in the wiring or motor that needs to be investigated further. If the fuse lasts awhile and then blows again, the motor is probably running hot due to worn brushes and/or bushings and needs to be replaced.
The motor itself can be checked by using a pair of jumper wires to see if it works. Connect one wire to ground and the other to a source of battery voltage. If the motor does nothing, it needs to be replaced. If the motor spins when jumped with 12 volts, the problem is in the motor control circuitry, resistors or fan speed switch.
Suppose you have a blower motor that runs (you can hear it) but no air comes out of the ducts. The problem here is a jammed or inoperative air flow control or blend door (this applies to defrosters that don't work, also). Try changing the temperature setting. If you don't hear movement from the doors inside the HVAC unit, you'll have to troubleshoot the control system. With ATC systems, you'll need a scan tool to access the self-diagnostics and/or to run door motor checks.
Doors also can be jammed by objects that have been placed on the dash and have disappeared down the defroster ducts. The cure here is to extract the object from the plenum by fishing through the heater outlet with a coat hanger or magnet - or removing the plenum.
With vacuum-controlled doors, the most common reasons for failure are leaky or loose vacuum hoses, or defective diaphragms in the little vacuum motors that move the doors. You can check for vacuum by starting the engine and disconnecting the small hose that goes to the vacuum motor that works one of the doors. If you feel vacuum or hear a hissing sound when trying different temperature settings, the vacuum source is okay and the problem is a bad vacuum motor. You also can test a vacuum motor by applying vacuum to it with a hand-held pump to see if it moves and holds vacuum (otherwise it should be replaced). If there's no vacuum, check for leaky vacuum hose connections, a defective temperature control switch, or a leaky vacuum reservoir under the dash or in the engine compartment.
Most defroster problems (no air to the windshield) are also caused by inoperative air flow control doors, or loose, deteriorated or damaged ducts.
 Another often overlooked cause of poor blower performance, heating, cooling and defrosting is a plugged cabin air filter. These filters are used on many later-model vehicles and should be changed according to the maintenance schedule in the owner's manual. Filters that have activated charcoal to absorb odors should be replaced yearly. Dust filters should be replaced every two to three years as a rule. Cabin air filters can usually be found under or behind the glove box, or at the base of the windshield where air enters the HVAC system through the cowl duct.
Heater Does Not Produce Any Heat
When no or low heater output is not due to a blower problem (plenty of air coming out of the ducts but the air isn't hot), possible causes include the following:
Blocked circulation through the heater core, due to either sediment in the core or a defective heater control valve. Feel the heater inlet and outlet hoses while the engine is idling and warm, and the heater temperature control is on hot. The hose will not feel hot on the heater side of the valve if the valve is shut. The outlet hose will also not be hot.
With cable-operated control valves on older vehicles, check the cable for sticking, slipping (loose mounting bracket) or misadjustment. With valves that are vacuum operated, there should be no vacuum to the valve when the heater is on (except for those that are normally closed and need vacuum to open). Someone may have misrouted a vacuum hose.
With electronic heater control valves, check for voltage at the valve. It should have voltage when the temperature controls are set for maximum heat. If the solenoid fails to move when voltage is applied, it is defective and needs to be replaced.
If the heater core appears to be plugged, the inlet hose may feel hot up to the core but the outlet hose will remain cool. Reverse-flushing the core (forcing water into the heater outlet pipe with a garden hose) can sometimes open up a blockage, but usually the core will have to be removed for cleaning or replacement.
Air pockets in the heater core also can interfere with proper coolant circulation. It's akin to losing the prime with a siphon pump. Air pockets form when the coolant level is low or when the cooling system is not properly filled after draining.
A low coolant level can also cause poor heater output. A low coolant level is often due to a coolant leak. A low coolant level can starve the heater resulting in little or no heat output. To check the level, pay no attention to the overflow reservoir. Shut the engine off, wait 20 minutes or so for the engine to cool, then carefully open the radiator cap. Allow any residual pressure to vent itself completely before removing the cap. If the coolant level inside the radiator is low, adding coolant won't fix the problem if there's a leak. Inspect the water pump, hose connections, radiator and engine for coolant leaks. Also pressure-test the cooling system and radiator cap to check for internal coolant leaks due to a bad head gasket or cracks in the cylinder head. Check the pressure rating on the cap to see that it's correct for the application, and carefully inspect the cap's gasket and spring. Replace the cap if it can't hold its rated pressure or has the wrong pressure rating for the application.
A Defective or missing thermostat that allows the engine to run too cool can also reduce heater output. Maintaining the correct engine operating temperature (usually 200 to 220 degrees F.) is essential not only for good heater output but also for good fuel mileage and proper operation of various emissions control functions. If the temperature gauge on the dash reads low, the engine is slow to warm up or you can feel coolant rushing through the upper radiator hose when the engine is cold started, the thermostat is stuck open (or missing) and needs to be replaced. Be sure to install a thermostat that's rated at the same temperature as the original (usually 195 degrees on late-model cars).
A weak water pump that fails to circulate an adequate amount of coolant to the heater will also reduce heater output. This problem also will cause the engine to overheat. If the problem is not due to a slipping drive belt, the pump probably has a badly eroded or loose impeller.
Heater Core Leaks
A leaky core will drip coolant into the passenger compartment (don't confuse this with water condensation that may be coming from the A/C evaporator). A leaky heater core may also cause the windshield to fog up as coolant vapor rises up through the defroster ducts. Antifreeze has a sweet smell.
 Cooling system neglect can allow internal corrosion to eat small holes in the heater core or where the pipes are soldered to the end tank. This can happen if the coolant has never been changed, if the corrosion inhibitors in the coolant are worn out, or if the coolant has been contaminated with tap water that contains salt or minerals. Electrolysis corrosion can be caused by a variety of things, so it is important to diagnose the cause and fix it to prevent further corrosion - especially if you are replacing the heater core.
Heater core leaks also can be caused by sediment circulating inside the cooling system. Sediment can the result of corrosion inside the cooling system (rust) or contamination (dissolved minerals in tap water). Sediment is abrasive and will literally wear holes as it flows through the twists and turns of the heater core.
Leaks also can develop from fatigue cracks in the inlet and outlet pipes on the heater core. This may be the result of flexing of the heater hoses from engine torque and/or vibration.
Adding a bottle of sealer to the cooling system may provide a temporary or long term fix, depending on how effective the sealer is at stopping the leak. The best type of sealer remains liquid until it encounters air at a leak, then it hardens to seal the leak. A good brand is BARS LEAK. Avoid using sealers that contain solid particles because the particles may also clog tiny passages in extruded aluminum radiator cores or coolant passages in some throttle bodies.
The only guaranteed fix for a leaky heater core is to replace the heater core with a new one.
Cooling system neglect can allow internal corrosion to eat small holes in the heater core or where the pipes are soldered to the end tank. This can happen if the coolant has never been changed, if the corrosion inhibitors in the coolant are worn out, or if the coolant has been contaminated with tap water that contains salt or minerals. Electrolysis corrosion can be caused by a variety of things, so it is important to diagnose the cause and fix it to prevent further corrosion - especially if you are replacing the heater core.
Heater core leaks also can be caused by sediment circulating inside the cooling system. Sediment can the result of corrosion inside the cooling system (rust) or contamination (dissolved minerals in tap water). Sediment is abrasive and will literally wear holes as it flows through the twists and turns of the heater core.
Leaks also can develop from fatigue cracks in the inlet and outlet pipes on the heater core. This may be the result of flexing of the heater hoses from engine torque and/or vibration.
Adding a bottle of sealer to the cooling system may provide a temporary or long term fix, depending on how effective the sealer is at stopping the leak. The best type of sealer remains liquid until it encounters air at a leak, then it hardens to seal the leak. A good brand is BARS LEAK. Avoid using sealers that contain solid particles because the particles may also clog tiny passages in extruded aluminum radiator cores or coolant passages in some throttle bodies.
The only guaranteed fix for a leaky heater core is to replace the heater core with a new one.
Replacing a Heater Core
Access to the heater core depends on its location. In most vehicles, replacing the core is a time-consuming, back-twisting, neck-wrenching job because of its buried location under the dash. Labor times on many vehicles can run six to eight hours or more to replace the heater core. So you want to be absolutely sure of your diagnosis before you tear the dash and HVAC system apart.
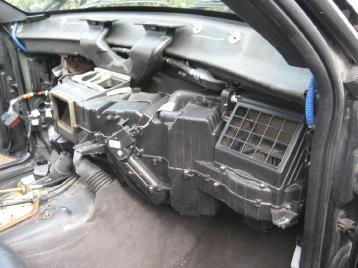
Replacing the heater core may require removing the dash and tearing apart
the hvac unit. It's a job!
Once you have the HVAC system opened up, you also should check the condition of the evaporator. If the A/C system has been leaking refrigerant, chances are there might be pinholes in the evaporator. Now would be a good time to replace it if replacement is needed.
After the heater core has been replaced, refill the cooling system with a fresh 50/50 mixture of antifreeze and clean water if the coolant is more than two years old (conventional coolant) or five years old (extended-life coolant).
If the old coolant is extremely dirty or contains sediment, you should thoroughly flush the cooling system not once but several times to remove all the debris. Even a little bit of sediment that remains in the system can shorten the life of the heater core and water pump.
Refilling some cooling systems can be tricky, particularly on some vehicles with front-wheel drive or rear-mounted engines. Air pockets tend to form in long heater hoses and heaters that are mounted higher than the radiator. To help vent the trapped air, some vehicles have "bleeder" valves on the hoses. Opening the valves allows air to escape as the system is filled. The valves are then closed when coolant reaches their level. On vehicles that lack these special bleeder valves, it may be necessary to temporarily loosen the heater outlet hose so air can bleed out as the system is filled. Another trick is to raise the front end of the vehicle off the ground so the radiator filler opening will be the highest point in the system.
The condition of the heater and radiator hoses as well as the drive belts also should be inspected at this time. Pinch the hoses. Any that feel hard, mushy, are age cracked or chaffed should be replaced. New clamps are also recommended. Most experts say you should replace the hoses and belts if they're more than four years old. If the heater core is being replaced because of cracked inlet or outlet pipes, the heater hoses may have to be lengthened and/or rerouted or supported with supplemental brackets to minimize flexing and the transmission of engine vibrations to the heater pipes.
Heater Blower Problems
On some older GM and other applications, the heater blower circuit has a switch on the ground side of the blower circuit rather than the power supply side. The reason for this is that switching the ground side of the circuit rather than the power supply side reduces radio frequency interference. On these applications, the resistors run very hot and often fail. A fuse is often located on the resistor board. The fuse only protects the low and medium blower speeds. High speed will still work if the resistor fuse is blown.
On 1996 GM FWD minivans, two blower relays are used (low and high speed). If a vehicle has only low or high blower speed, the cause is probably a failed low- or high-speed blower relay.
On the 1997 Pontiac Grand Prix, the blower circuit has one module with a relay and resistors mounted inside the plenum. This module is about the size of a credit card and runs very hot. It can explode if any water from outside the vehicle or an internal heater core leak comes into contact with the module.
On GM applications that use a pulse width modulated blower speed control module inside the HVAC unit, the module often gets dirty, runs hot and fails. On these applications, you need a scan tool to check the module.
On late-model Cadillacs, the blower motor and power module are combined into one unit. If the blower isn't working, you can't use a jumper wire to bypass the relay to see if the fan motor spins. You have to replace the whole unit (which is very expensive). Again, using a scan tool here can help you diagnose the fault.
 Related Articles:
Finding & Fixing Coolant Leaks
Cooling System Electrolysis Corrosion (causes & cures)
Servicing Your Cooling System
Radiator Repair & Replacement
Your Temperature Warning Lamp Is On. What Should You Do?
Overheating: Causes & Cures
Troubleshooting Cooling Problems with Temperature
Belt & hose service
Coolant Checks & Changes More Complicated These Days
Universal Coolant
 Click Here to See More Carley Automotive Technical Articles
Be sure to visit our other websites:

OBD2HELP
ScanToolHelp
TROUBLE-CODES