 More Engine Repair Articles:

Nobody wants engine problems such as oil consumption, a compression leak, valvetrain noise or an outright valve failure. So every effort should be made to make sure everything that is worn or damaged is replaced or reconditioned when rebuilding a cylinder head. But sometimes valve problems occur anyway and lead to expensive comebacks.
How can you avoid such woes? By understanding the causes of valve failure and making sure you have not overlooked anything when replacing and reconditioning valves, seats, guides and the rest of the valvetrain components.
Valve work can be a tricky aspect of engine rebuilding for several reasons. For one, it requires absolute precision. Close enough is not good enough. If tolerances are not exact and the valvetrain geometry is not right on you are going to have problems. Guaranteed.
Valve work also requires attention to detail. The kind of details we are talking about here are worn parts that appear to be okay but are not and need to be reconditioned or replaced. The best advice here is, "If in doubt, toss it out." Not being too particular about the condition of the valve stems, guides, keepers, retainers, springs, rocker arms and pushrods can lead to trouble. Not checking details like installed valve stem height, installed spring height, stem-to-guide clearance, seat width and contact, rocker arm alignment, and so on will get you every time.
What is more, valve work often requires a certain amount of detective work. To fix a valve problem, you first have to figure out what caused it in the first place.
Replacing a broken valve, for example, won't fix the problem if he underlying cause is misalignment between the valve guide and seat. Unless the misalignment is corrected, the new valve will fail too as flexing causes it to fatigue and break.
Replacing a burned valve won't fix a compression problem if the underlying cause is a hot spot in the cylinder head. If the hot spot is not eliminated, the new valve will run hot and burn too.
Replacing a worn guide by installing a new one, a liner or a valve with an oversize stem won't fix an oil consumption problem if guide wear is the result of excessive side scrubbing of the valve stem due to rocker arm misalignment. Unless the stem height is corrected, the guide repair won't last.
That is why analyzing what caused a problem before you try to fix it is so important. Broken or burned valves as well as worn or loose guides, cracked or loose seats and similar valvetrain damage is often the end result of a chain reaction of events. One problem leads to another and eventually a valve failure. So replacing parts without understanding what made them fail is no fix at all.
To avoid valve related problems down the road, do the following:
1. Analyze the amount of wear as well as wear patterns in the head and valvetrain components when the head is disassembled. A careful inspection should reveal any abnormal conditions or wear patterns that would indicate additional problems.
2. Inspect each and every component in the valvetrain and head so all worn or damaged parts can be identified and replaced or reconditioned.
3. Keep a close watch over production quality so the parts that are being reconditioned are done so correctly.
4. Pay attention to specs, critical dimensions and rocker arm geometry to assure proper reassembly.
Many things can make a valve fail. Defective valves are one thing nobody talks much about, but it ranks as the number two cause of valve failures. Thermal and mechanical overstress is number one.
One study that was conducted by a leading valve manufacturer found that as many as 1 out of every 5 (20.7%) valve failures resulted from defects in the valves themselves!
This particular study was published over a decade ago, and even though the same basic alloys and manufacturing processes that were used then are still used today quality control has come a long ways. CNC (Computer Controlled Numeric) production machinery and statistical process control have done much to eliminate human error in the manufacturing process. But like any other mass produced component, defects occasionally slip through. So do not rule out bad valves as a possible cause of a premature valve failure.
Defects include the presence of metallurgical impurities and inclusions in the metal that weaken the valve, forging defects that leave microscopic cracks, pores or separations in the metal that lead to breakage, faulty welds between stems and heads in two-piece valves that can allow the head to separate, faulty welds in hollow stem valves that can lead to breakage, improper heat treatments that fail to fully harden or anneal a valve resulting in rapid wear, machining errors that produce the wrong dimensions or surface finish which can cause all kinds of problems if not detected prior to installation, and poor adhesion of chrome plating that allows the protective plating to flake off the stem.
The best way to make sure the new valves you are using are free from defects, therefore, is to (1) inspect the valves to make sure tolerances are within specs (stem diameter, stem taper, overall length, etc.) and there are no obvious defects (nicks, pits, hairline cracks, etc.), and (2) source your valves from a reliable supplier. One valve looks pretty much like another, so you cannot judge quality by appearances alone. A cheap price may be attractive, but if the valve does not hold up where is the savings? So don't take chances on poor quality valves from questionable suppliers that might end up costing you far more than what you saved on the valves themselves. Buy from a reputable supplier who stands behind their product.
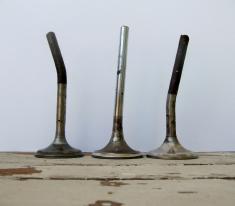
Any valve will eventually wear out if driven enough miles. But many valves call it quits long before they should because of burning or breakage.
Let's talk about burning first. Exhaust valves are the ones most likely to burn because they run hotter than the intakes. The intake valves are cooled by the incoming air and fuel, and consequently operate at about 800 degrees F. Exhaust valves, on the other hand, receive little such cooling and are blasted by the hot combustion gases as they exit through the exhaust port. Exhaust valves run at 1200 to 1350 degrees F. on average, which makes them much more vulnerable to erosion and burning than intakes. The higher operating temperature requires a tougher alloy, so exhaust valves are usually made of stainless steel or have stainless steel heads (typically 21-2N or 21-4N alloy with a high chromium and nickel content). For heavy-duty gasoline and diesel applications where heat is even more of a problem, a tough Stellite facing (cobalt alloy) may be needed on the exhaust valve face to control wear.
The intake and exhaust valves rely on physical contact with the valve seat and guide for cooling. About 75% of the combustion heat that is conducted away from the valve passes through the seat, so good seat contact is essential to prevent burning. The remaining 25% of the heat is dissipated up through the valve stem and out through the guides. Sodium filled hollow valve stems in heavy-duty applications are sometimes used to draw even more heat up through the stems to aid cooling. If the valve does not receive adequate cooling, it can overheat, burn and fail.

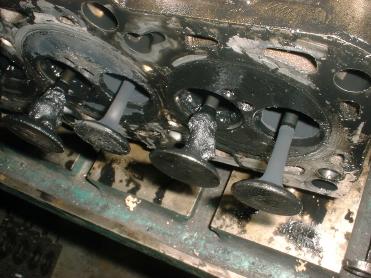
Anything that interferes with valve cooling or creates extra heat in the valve or head can lead to premature valve failure. A buildup of deposits on the valve face and seat can have an insulating effect that slows cooling and makes the valve run hot. So too can poor contact between the valve and seat if the seat is too narrow, nonconcentric or off-square. If deposits build up in one spot or flake off in another, it can allow leaks that create hot spots on the valve and result in "channeling" (grooves eroded or burned into the valve).
Weak springs or insufficient valve lash can also prevent good valve-to-seat contact and allow excessive heat to build up in the valves. A loose seat or poorly fitting guide can also hinder heat transfer to the head and contribute to burning.
Not paying attention to the installed valve height when doing a valve job can lead to burning. When valves and seats are ground or cut, the valves sit deeper in the head than before. This causes the stems to stick up higher which changes the rocker arm geometry and may lead to a loss of valvelash when the engine gets hot. Two engines where this particular problem has been turning up are the Ford 2300 OHC engine and the rear-wheel drive version of the Mitsubishi 2.6L (which has hydraulic lash adjusters). If the proper geometry cannot be restored by grinding the tips of the valve stems (no more than about .010 maximum or you run the risk of grinding through the case hardened layer), the seats should be replaced to correct installed height (an expensive fix but cheaper than a comeback). Another option is to install valves with slightly oversized heads (.030 in.) that ride higher on the seat to compensate for seat machining.
Valve recession can cause the same kind of problem. As the seats wear away and the valves recede into the head, valvelash is lost. Eventually there is little or no lash left and the valve makes poor contact with the seat, overheats and burns. Valve recession tends to be more of a problem on older engines that lack hard valve seats and are used in heavy-duty truck, marine, agricultural or industrial applications. The cure here is to install hard seats. Stellite or hard faced valves may also be necessary if the valves show evidence of erosion.
Cooling problems in the engine itself can lead to valve sticking and burning if the operating temperature gets too high. Low coolant, a defective thermostat, a weak water pump, a radiator obstruction, a defective cooling fan or fan switch, etc. can all make an engine run hot. This, in turn, makes the valve stems swell which may cause them to gall or stick in their guides if there is not enough clearance. If the valve sticks open, it can burn or be destroyed if it smacks the piston.
Blockages caused by casting flash inside the head or a head gasket that does not have the correct coolant holes can allow hot spots to form that can cause valve and guide problems. So too can a buildup of scale inside the head the interferes with good heat transfer.
Valves can also run hot because of elevated combustion temperatures. Factors such as retarded ignition timing, lean fuel mixtures (often due to vacuum leaks), detonation (from too much compression or low octane fuel) or preignition (from hot spots caused by deposits in the combustion chamber or too hot a spark plug) can all play a role here. Likewise, exhaust restrictions such as a clogged catalytic converter or crushed pipe can make the valves run hot.

Breakage, which is the other main type of valve failure, can happen to either intake or exhaust valves. Valves break in one of two places, where the head is joined to the stem, or where the keeper groove(s) are machined into the end of the stem. Either way, breakage is bad news because the pieces fall into the combustion chamber and wreak havoc on the piston and head.
Causes of head breakage include fatigue failure from valve flexing (from off-square seating that causes the stem to flex every time it seats), pounding (from excessive valvelash), stretching (from excessive heat and/or rpm), and thermal shock (sudden temperature changes as when abruptly shutting off a highly loaded engine). With two-piece valves, the junction between the stem and head is where the valve often cracks and separates, not because the valve is defective (though a poor weld could be a factor) but because this area is highly stressed due to the joining of two dissimilar alloys.
Breakage at the stem tip can result from excessive sideloading if the installed stem height is not right and causes rocker arm misalignment. It can also be caused by excessive valvelash that prevents the valvetrain from cushioning the valve as it closes. Another condition that may cause the tip of the stem to snap off is wear or scratches in the keeper groove(s) or coil bind (running a cam or rocker arms with too much lift).
In addition to burning and breakage, there are a number of other valve problems to watch -- some of which may indicate underlying problems that also need to be corrected:
The seal controls the amount of oil that lubricates the guides. Positive seals provide the most oil control because they remain on the guides and act like a squeegee to scrape oil off the stems. Positive seals are used on most overhead cam engines because there is more oil flow in the head that needs to be controlled. Umbrella and O-ring deflector seals, on the other hand, ride up and down with the valve and allow more oil into the guides. Substituting a positive seal for an umbrella or O-ring seal, therefore, may starve the guide for oil and create a scuffing problem on some applications.
Because of this, some experts say you should always use the same type of seal that was originally used on the engine. Others prefer to upgrade older pushrod engines to positive seals to reduce oil consumption. The stock valve stem seals on smallblock Chevys, for example, tend to get brittle rather quickly. Upgrading to a premium seal material such as Viton can cure this problem. But if positive seals are installed, the best way to avoid trouble is to use them only on the intakes, pay close attention to stem-to-guide clearances (not too tight) and to use valves with chrome plated stems which are more scuff resistant than unplated valves.
Many newer engines with aluminum heads have powdered metal valve guides. The guides are iron based and contain graphite so the guides are not as dependent on oil for lubrication as before. This allows tighter clearances while reducing the danger of scuffing. These guides tend to be brittle and should be pressed in rather than driven in.
When measuring stems, remember that most OE valve stems are tapered. The head end of the stem is usually about .001 in. smaller in diameter than the tip to compensate for increased thermal expansion in the hot end. Where the measurement is taken is very important for an accurate reading on stem wear. If the OE valve is replaced with one that has a straight stem (not tapered), the valve may stick unless the guide clearance is opened up a corresponding amount.
The bottom line to valve failure analysis is this: replacing a bad valve with a new one won't fix anything if there is an underlying problem that has not been corrected. Following accepted valve and seat refinishing techniques (leaving adequate valve margin, proper seat positioning and width), checking and correcting installed stem height and installed spring height, maintaining adequate stem-to-quide clearance and valvelash, and ruling out other engine problems such as overheating, detonation, air/fuel or timing problems, etc. will go a long ways towards preventing repeat valve failures.
More Engine Repair Articles: Click Here to See More Carley Automotive Technical Articles