 Related Articles:

Electronic instrument panels are used on many late model vehicles to display speed, fuel level, engine rpm (tachometer) and other gauge readings and warning lights.
One thing all electronic instrumentation shares in common regardless of make or model is the need for proper voltage and grounding. Most instrument clusters require a minimum operating voltage of 10 volts. If your electronic instrument panel is acting strangely, displaying weird or broken characters, not reading accurately or is displaying nothing at all, the first things you should check are the instrument cluster fuse, the presence of battery/ignition voltage at the cluster harness and the continuity of the cluster ground.
Replacing a blown fuse doesn't fix a dead instrument panel. It may temporarily restore power, but until you find out why the fuse blew you have only treated the symptom, not the cause. If a fuse blows again as soon as you replace it, it is a pretty good indication that the cluster or wiring harness is shorted. Disconnect the wiring harness from the cluster and check for a grounded power circuit with an ohmmeter before condemning the cluster.
The presence of battery/ignition voltage at the instrument cluster wiring harness should be checked with a voltmeter rather than a test light because you can't always judge low voltage by the brilliance of a simple 12 volt test light. Electronics are very sensitive to voltage levels, and 9.5 volts might not be enough for a cluster that requires a minimum of 10.0 volts to operate correctly.
To check the voltage, look up the wiring diagram in a shop manual, then pull the connector off the back of the cluster and probe the appropriate pin(s) with your voltmeter with the ignition on. If you do not find normal battery voltage, you will have to trace the problem using the wiring diagram.
If the instrument panel appears to be working normally (gauges reading normally), but the instrument panel is not lighting up, the fault could be a bad headlamp switch or interior lights dimmer switch (if separate from the headlamp switch).
A good ground connection is also extremely important. The presence of voltage at the panel harness won't make the panel work if there is a bad ground connection. Since the instrument cluster is mounted in a plastic dash, a separate ground wire or ground circuit through the wiring harness is usually needed to complete the power circuit. Refer again to the wiring diagram to find the ground path, and then check it with your ohmmeter. Do not use a self-powered test light because it cannot measure resistance (any resistance will lower circuit voltage).
Another essential element all electronic instrument clusters require is accurate input from vehicle sensors. The speedometer, tachometer, fuel level, oil pressure, voltage and temperature gauges obviously cannot function correctly if there is a problem with the corresponding sensor or its wiring circuit.
If everything on an electronic instrument panel seems to work okay except for one gauge that continually reads high, low or erratic, there is a high probability the problem is not in the cluster electronics but in the sending unit, sensor or wiring (especially if the gauge illuminates normally).
If one or more gauge display do not light up, however, or flicker, the problem is likely in the instrument panel itself.
Once again you will need to refer to a wiring diagram to check continuity between the instrument panel wiring harness and the various sending units and sensors.
One way to quick check electronic gauges is to go directly to the sending unit or sensor and ground it. In most cases, grounding will cause the gauge to read maximum, telling you there is nothing wrong with the electronics or wiring. The problem is in the sensor or sending unit.
When you first turn the ignition on, some instrument panels go through a short self-check procedure during which all the display segments and warning lights come on for a bulb check. Watch for any dark segments or indicators that fail to illuminate.
Self-check procedures vary a great deal from one vehicle to the next, but on some applications you can run a self-check diagnostic by pressing certain display buttons. Look in your owners manual for instructions on how to run an instrument cluster self-check (if provided). This information can also be found at the OEM service information websites.
Below are a two examples of instrument panel self-diagnostic procedures that are available on some cars:
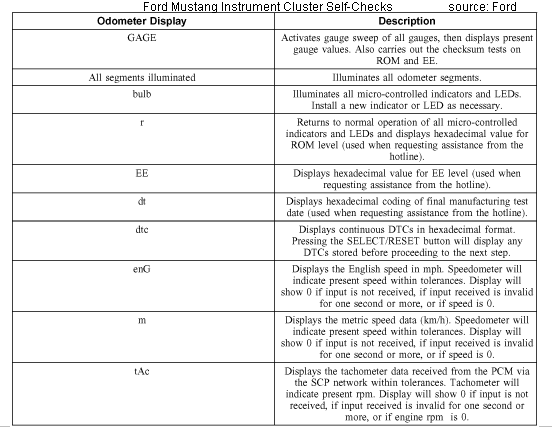
On 1999 and later Ford Mustangs, the instrument cluster has a built-in self-diagnostic mode that can be accessed by pressing and holding the instrument cluster SELECT/RESET button. Insert the ignition key and turn to the RUN position (but don't crank or start engine). Continue to press and hold the SELECT/RESET button (for 5 seconds) until the word TEST is displayed by the odometer.
Release the SELECT/RESET button within three seconds after the word TEST is displayed to begin the self-diagnostic mode.
Now every time you press the SELECT/RESET button, you will advance through a series of self-diagnostic checks and displays until any fault codes that are present for the instrument panel will be displayed. Keep going and the unit will cycle through a series of gauge (GAGE) displays and self-checks.
To exit the instrument panel self-diagnostic mode, turn the ignition switch OFF, or press and hold the SELECT/RESET button for three or more seconds after all fault codes and GAGE test results have been displayed, then release the buttons.

On older Chrysler electronic instrument display panels that have a tachometer, the self-diagnostic sequence is initiated by pressing the TRIP and TRIP RESET buttons simultaneously, turning the ignition on, then releasing the buttons. On those without a tach, press STEP and U.S./MET buttons simultaneously. If nothing happens, the panel is bad. The odometer should display EIC indicating the cluster is ready to begin the self tests.
To begin the first 5 tests, press the U.S./MET button. All vacuum fluorescent displays should illuminate. If the number 1, 2 or 3 displayed on the speedometer, there is a fault in the speedometer and the cluster needs to be replaced. A fault code 4 indicates a problem in the odometer memory chip (only the chip has to be replaced). When the number 5 appears, the cluster has passed the first five tests.
To sequence through the next 3 tests, you have to press the U.S./MET button each time. The sixth test illuminates all the individual display segments and flashes a 6 when complete. Test 7 lights up all the gauge scales and symbols and flashes a 7 when complete. Test 8 lights up the warning lamps in sequence and flashes an 8 when through. If the cluster passes all 8 tests, then the problem is outside the cluster.
If you have a Chrysler dash where the fuel, temp and oil gauges all read maximum and remain there after the engine has started, check for a loose module connector on the back of the cluster.
If the speedometer and odometer do not work, check the operation of the "distance sensor" (speedometer sending unit) on the transaxle with an ohm meter. Set the scale so that readings of less than one ohm will be shown clearly. Connect the meter to the sensor terminals and turn it. A good sensor should produce eight distinct pulses of 0.5 ohms or less with every revolution. Do not use a test light on the sensor as doing so may damage it.
Electronic instrumentation is fairly reliable, but from a service perspective, either it works or it does not. There is nothing in between. It makes no difference if the entire panel is dead or of only one gauge or display is acting up. In most instances, vehicle manufacturers have made no provisions for "field servicing" or repairing an instrument cluster if it is defective. You have to replace the entire instrument panel with a new unit or a used unit from a salvage yard, or find a source online that repairs electronic clusters.
The only components that you can generally replace yourself are dash light bulbs. But some of these are now an integral part of the circuit board (the turn signal indicators, for example) and cannot be replaced if they fail.
Even if you are an electronics wizard who knows how to test and replace individual circuit components, the vehicle manufacturers have not made the necessary service information available to the aftermarket. So for most of us, the only practical alternative is to replace the cluster if it has an internal problem, or send it to someone who specializes in this type of repair work.
Tearing apart a dash to extract the instrument panel is fairly easy on some vehicles, and a major ordeal on others. The best advice is look up the step-by-step replacement procedure for the panel BEFORE you tear into it. This way, there won't be any surprises, and you will have an idea of what's involved BEFORE you start the disassembly.
WARNING: Always disconnect the battery BEFORE you begin any electrical work. This will eliminate the risk of accidentally shorting any wires that might cause electrical damage or start a fire. It will also disable the airbag circuit so the air bag is not accidentally triggered.
Most states have laws regarding odometer tampering, so if the electronic instrument cluster in your vehicle has an electronic odometer and memory chip, the memory chip must be transferred to the new instrument panel. What happens if you forget or lose the original odometer chip? You are supposed to put a sticker on the door certifying the date and mileage that a new zeroed odometer was installed. The vehicle manufacturer may also be able to supply you with a replacement odometer chip that is programmed with your old mileage (if possible).
There are also federal laws that prohibit odometer tampering. The Federal Truth in Mileage Act (TIMA) requires vehicle sellers to provide actual, truthful odometer readings and to disclose any known inaccuracies. TIMA makes odometer fraud a felony. Failure to disclose that an odometer has been changed or repaired (altered in any way) and/or falsifying mileage documentation will result in fines and/or imprisonment.
Digital odometers can be reprogrammed to change the mileage. Some electronic cluster repair companies can do this for you, but require a signed statement as to your vehicle's actual mileage. Some new car dealers can also use an authorized factory scan tool to reset the odometer in a replacement instrument cluster to the vehicle's actual mileage after an instrument panel has been replaced. You can also buy software online that hacks into a digital odometer and allows you to reset the mileage reading. Be warned, however, that rolling back the mileage to make your vehicle appear to have less wear and tear than it actually has can get you into hot water if you later sell the vehicle and are caught trying to cheat someone. Used car buyers will often use CARFAX or a similar service to check a vehicle's history, including its mileage.
Recall number: 21V577000. The instrument cluster assembly part number 94001-S9500 and 94001-S9510 on the 2022 KIA Telluride is being recalled for a possible defect that may cause the LCD cluster to remain blank when the vehicle is first started. The blank instrument display may be missing important instrumentation, such as the digital speedometer, gear selection indicator, and odometer. A lack of access to this information may heighten the risk of a crash.
The fix is to update the instrument panel software (no charge).
June 2015: Ford Motor Company issued a safety compliance recall for approximately 203,500 2014-2015 Transit Connect and Escape vehicles in North America for an issue with the instrument panel cluster. When starting the vehicle, the instrument cluster, warning chimes, messages and warning lights may not work, which is a compliance issue with FMVSS 101 and other applicable FMVSS requirements. If these displays do not work as intended, it could increase the risk of a crash.
Recalled vehicles include certain 2014-2015 Transit Connect vehicles built at Valencia Assembly Plant in Spain from May 13, 2014, to Dec. 10, 2014; and certain 2014-2015 Escape vehicles built at Louisville Assembly Plant from May 19, 2014, to Feb. 6, 2015.
Ford dealers will update the instrument panel cluster software at no cost to the customer.
Related Articles: Click Here to See More Carley Automotive Technical Articles