
Home,
Auto Repair Library, Auto Parts, Accessories, Tools, Manuals & Books, Car BLOG, Links, Index
How to Replace a Muffler
Copyright AA1Car.com
Is your muffler rusted out or noisy? Do you want to replace your stock muffler with a performance muffler for more power and fuel economy?
Replacing a muffler is a job that most do-it-yourselfers can do, though it can be physically challenging because it usually requires sawing or cutting through the old pipes on either side of the muffler and working while laying on your back. If that sounds like too much effort, take your car to a muffler shop and have them replace the old muffler. But if you want to save yourself some money, buy a replacement muffler at your local auto parts tore and follow these steps to replace the muffler yourself.
TOOLS REQUIRED: Jack; safety stands; wrenches; hacksaw; muffler chisel; hammer; safety glasses.
PARTS NEEDED: Replacement exhaust pipe or muffler; pipe clamps.
WHEN: When exhaust leaks or noise are noticed, or you want to install a different type of muffler.
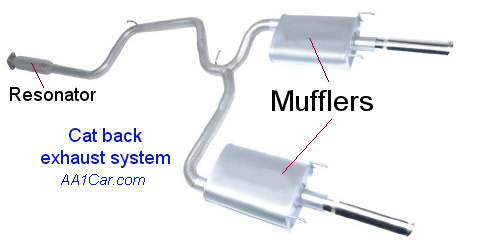
LOCATION: The muffler is part of the exhaust system and is located after the
catalytic converter. Many vehicles have more than one muffler, the second being called a resonator.
NOTE: The original equipment muffler and pipes on most vehicles are welded together rather than clamped or bolted together. This means you will probably have to saw or cut the pipes apart to replace the muffler.
WHAT TO DO: First determine the nature of the problem by carefully inspecting the exhaust system from end to end. Most leaks occur at pipe connections or at tight bends in the pipe. Mufflers rust through at the pipe connections and along end and side seams (fig. 11-2). Converters tend to rot off only at pipe connections.
1. With the vehicle parked on level ground, set the parking brake and place the transmission in Park (automatic) or gear (manual). Also block the wheels to prevent the vehicle from rolling.
2. Raise whichever end of the vehicle is necessary to gain access to the faulty exhaust component, and support the vehicle on safety stands.
3. It may be necessary to support part of the exhaust system while removing a rusted out pipe or muffler. Use a short piece of coat hangar wire to prevent the pipes from dropping.
4. Locate the muffler and note how it is attached to the pipes on either side.
If the muffler has flanges with bolts, remove the bolts to replace the muffler.
If the muffler has clamps on one or both sides, remove the clamps to replace the muffler. This usually requires sawing or cutting the clamp because the
nuts will probably be badly rusted and won't turn. Presoak the nuts with penetrating oil and applying heat with a propane torch will help loosen them. Another option is to use a large breaker bar and six point impact socket to twist and break the rusted nuts off the clamps.
 .
.  . .
. . 
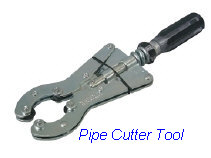
If the muffler is welded to the pipes, your only option is to cut the pipes on either side using a hack saw, Sawsall, pipe cutter or acetylene torch.
CAUTION!: If using a torch to cut the pipes, be extremely careful to keep the flame away from the fuel tank, fuel lines, brake lines or any other hoses or wiring.
Measure BEFORE you cut the pipes! Measure the length of the new muffler end to end including both pipe mounting flanges. Make sure you leave enough
of the original pipes on both sides of the old muffler so that both ends of the pipes will fit at least 2 inches into the new muffler. If you don't
have enough overlap in the pipe connections when you replace the muffler, the exhaust system may leak (unless you are welding the pipes together rather than clamping them).

Don't waste your time trying to separate a muffler from badly corroded or rotten pipes. The old pipes will also have to be replaced.
If the exhaust pipes are still solid and the muffler is clamped to the pipes, the pipes should be reusable. However, the muffler may be difficult to remove. Once an exhaust system accumulates a lot of miles, the connections become permanently rusted together. Heat and penetrating oil are useless, and the only way to separate the muffler from its pipes is to split open the outer muffler pipe flange on the inlet and outlet sides of the muffler with a muffler chisel. Be careful not to damage the pipe. You only want to cut open the flange so
the pipe can be pulled out of the muffler connection. If you damage the pipe, you can always use an adapter fitting to reconnect the pipe to the muffler.
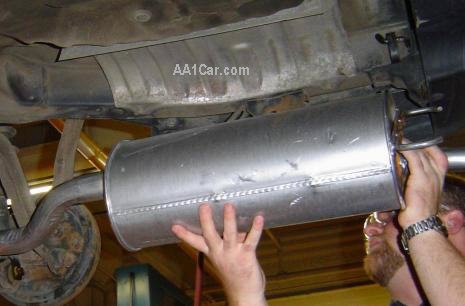
5. Install the new muffler and/or pipes by slipping each end into position. Pay attention to any markings on the muffler that indicate which direction to install it (installing it backwards could increase back pressure and reduce sound control). Make sure all pipe connections are shoved together as tight as they will go. If you have to "convince" them by pounding, use a rubber hammer to avoid denting or deforming the pipes.
Sometimes a replacement pipe coupling or muffler flange will be dented or slightly bent from the parts store, preventing it from easily slipping into place. A special tool called a "pipe expander" or "muffler cone" can be inserted into the end of the pipe to restore its shape. A pipe expander pushes out as you tighten a bolt to reshape or expand the pipe. A muffler cone is pounded into the pipe to expand or reduce the diameter of the pipe. Either tool can usually be rented at an auto parts store.
6. The secret to getting rattle-free repair is to careful position the pipes BEFORE you tighten the clamps. Wiggle the pipes around until they align properly and nothing touches the suspension or underside of the vehicle. Make sure the exhaust system allows adequate room for the fuel tank, suspension travel and ground clearance. Then mount the new pipe clamps and tighten firmly.
7. Lower the vehicle and start the engine. Rev the engine and listen for any exhaust leaks or rattles. Readjust and/or retighten the pipes if needed.
8. After the vehicle has been driven a few hundred miles, it's a good idea to check and retighten the clamps as needed.
 More Exhaust Related Articles:
Performance Mufflers for More Power Better Fuel Economy
Exhaust Backpressure
Troubleshooting Exhaust Problems
Catalytic Converters
 Click Here to See More Carley Automotive Technical Articles
Be sure to visit our other websites:

OBD2HELP
ScanToolHelp
TROUBLE-CODES