
Home,
Auto Repair Library, Auto Parts, Accessories, Tools, Manuals & Books, Car BLOG, Links, Index

How to Repair or Replace Constant Velocity Joints
by Larry Carley copyright AA1Car.com
Sudden failures of constant velocity joints are rare, but CV joints do wear out and may fail as a result of loss of lubrication or grease contamination (usually due to a failed boot). A CV joint that is failing usually produces various symptoms:
- A popping or clicking noise when turning.
This almost always indicates a worn or damaged outer CV joint. A quick way to verify this condition is to put the car in reverse, crank the steering wheel to one side and drive the vehicle backwards in a circle (check the rearview mirror first!). If the noise gets louder, it confirms the diagnosis and the need for a new joint or replacement shaft assembly.
- A "clunk" when accelerating, decelerating or when putting the transaxle into drive
. This kind of noise can come from excessive play in the inner joint on FWD applications, either inner or outer joints in a RWD independent suspension, or from the driveshaft CV joints or U-joint in a RWD or 4WD powertrain. Be warned, though, that the same kind of noise can also be produced by excessive backlash in the differential gears. A quick way to verify the diagnosis here is to back the vehicle up, alternately accelerating and decelerating while in reverse. If the clunk or shudder is more pronounced, it confirms a bad inner joint.
- A humming or growling noise.
Sometimes due to inadequate lubrication in either the inner or outer CV joint, this symptom is more often due to worn or damaged wheel bearings, a bad intermediate shaft bearing on equal length halfshaft transaxles, or due to worn shaft bearings within the transmission.
- A shudder or vibration when accelerating
. Excessive play in either the inboard or outboard joints can sometimes cause this, but the most likely cause is a worn inboard plunge joint. These kinds of vibrations can also be caused by a bad intermediate shaft bearing on transaxles with equal length halfshafts. On FWD vehicles with transverse-mounted engines, this kind of vibration can also be caused by loose or deteriorated engine/transaxle mounts. For this reason, the rubber bushings in the upper "torque strap" or "dog bone" on these engines should also be inspected to rule out this possibility.
- A vibration that increases with speed
. This symptom is rarely caused by a failing CV joint or by FWD halfshaft imbalance. An out-of-balance tire or wheel, an out-of-round tire or wheel, or a bent rim are the more likely causes.
CV JOINT INSPECTION & BOOT REPLACEMENT
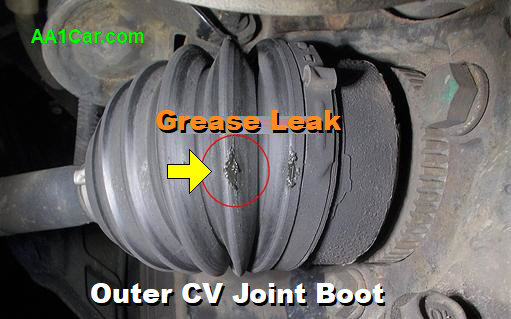
The first sign of trouble is grease seeping out of a small pinhole or crack in the rubber or plastic boot that surrounds a CV joint. Even a tiny leak can cause a rapid loss of grease because of centrifigul force flinging the grease against the inside of the boot as the shaft rotates. If the joint runs dry because of a leak, the joint will suffer rapid wear and eventually fail.
To prevent premature CV joint failure, you should inspect both the inboard and outboard CV boots on FWD and AWD axles when rotating tires, doing brake work or other undercar work such as changing the oil. Look for grease on the outisde of the boot, or on the inside of wheel or nearby suspension components (struts, contrl arms, steering knuckle, tie rods, etc.).
Synthetic rubberand plastic CV boots don't last forever. They can become brittle and crack as they age. After 8, 10, or 12 years of service, it is not unusual to discover one or more boots that are leaking. And if one boot is leaking, chances are the other boots on the axles are leaking too (or soon will be) because of their age.
Replacement boot kits are available for manye vehicles. However, most repair shops, car dealers and even do-it-yourselfers find it is faster and easier to replace the entire halfshaft assembly rather than trying to disassemble, clean, regrease and reassenble a shaft with new boots. Yes, it costs more to replace an shaft than rebuild it, but with a preasembled shaft you know the boots are installed correctly and with the correct type and amount of grease. Just be sure you buy a QUALITY replacement halfshaft that has new or reground CV joints, not old worn CV joints off a junk yard vehicle.
How long can you continue to drive with a leaking CV boot? It depends how bad the leak is. A tiny pinhole or crack that is slowly leaking grease may not cause a complete loss of grease for hundreds or even several thousand miles. But eventually the joint will run dry and wear will start to accelerate. The more turning you do, the faster the outer CV joints will wear. Eventually they will start to make a clicking noise when turning, which would tell you the CV joint has reached the end of the road and needs to be replaced without much delay. If you keep driving anyway, eventually the CV joint may fail completely, separate and leave you stranded becasue the joint will no longer be capable of driving the wheel.

This CV joint boot has a major tear and has failed completely. A boot in this bad of condiution will cause the joint to lose all of its grease almost immediately, and will not provide any protection against joint contamination from road splash, water or dirt. An exposed joint with a badly torn or missing boot like this will likely fail within a few hundred miles.
BOOT FAILURES
When a boot has failed, there is always some uncertainly about the condition of the CV joint and whether or not it has become contaminated with dirt and/or suffered wear or damage. If a joint is making noise, or there is excessive play or wobble in the joint, the CV joint is shot and needs to be replaced. But what if it is not making any noise or does not seem to be loose? It would probably be okay to disassemble the joint, clean it and repack with fresh CV grease, then reassemble the joint on the shaft with a new boot.
Most boot failures are not discovered until long after the boot has been leaking. If the grease that is left inside the boot feels gritty when rubbed between the fingers, the grease and joint are contaminated. ANd chances arel the joint has suffered enough wear that it should be replaced.

CV JOINT DISASSEMBLY & INSPECTION
Disassembling a CV joint is not difficult if you know how. The first trick is getting the CV joint off the end of the axle shaft. Some joints just pull off while others are held with a snap ring or lock ring which must first be released.
Once the joint is off, it can be disassembled by tilting the inner race to one side. This is done by inserting a dowel or similar tool into the splines of the inner shaft and tilting the race as far as it will go to one side. This will expose one of the balls which can be popped out of its cage window with a small screwdriver. The inner race is then tilted to opposite side so the next ball can be removed, and so on until all the balls have been removed from their cage windows. The cage can now be rotated sideways allowing it and the inner race to be removed from the housing.
What to look for: nicks, gouges, cracks, spalling, roughness, flaking, etc. on the surface of the balls or tracks in the inner and outer races. The cage windows should also be inspected for dimples, wear or cracks. Each ball should fit snugly in its respective cage window because looseness here is what often causes the clicking or popping noises associated with a worn CV joint.
CV joints are precision fit assemblies, so the balls should be kept in order so they can be reassembled in their same respective positions as before. Each ball and track develop a unique wear pattern as the joint ages, so mixing up the balls may change tolerances and create problems that did not exist before the joint was disassembled.
If the CV joint shows no wear or damage, it should be okay to reuse. If it does not pass inspection or is obviously defective, it needs to be replaced. Either way, before the CV joint goes back on the shaft it should be packed with CV joint grease (never ordinary chassis grease!). Special grease is usually provided with the replacement boot along with instructions on how to pack the joint. About a third of the grease is typically packed into the joint, and the rest is put inside the boot before it goes on to serve as a reservoir for the joint. There is some debate as to how much the grease actually moves around inside the joint and boot as the vehicle is being driven, but it is there for a purpose so it should be used.
CV JOINT BOOT INSTALLATION
When the new boot is installed over the joint, it must be properly positioned on both joint and housing. Most boots have a lip on the inside diameter of both ends that fits into a groove on both parts to assure a tight seal. Installed boots must not be crimped, twisted or collapsed. If the boot is not in its normal shape, loosen a clamp and "burp" it by carefully sliding a screwdriver between the boot lip and driveshaft or joint housing. This should allow enough air into the boot to return it to its normal shape.
Boot clamps must be installed according to vehicle manufacturer instructions or instructions provided with the replacement boot or joint. Some types of clamps require special tightening/crimping tools while others do not and just use a worm screw style clamp.

Other items that should also be inspected:
- On FWD transaxles with equal length halfshafts, the intermediate shaft U-joint, bearing and support bracket should be inspected for looseness by rocking the wheel back and forth and watching for any movement. A bad bearing would call for bearing or shaft replacement.
- Transaxle oil leaks around the inner CV joints. This would indicate a faulty transaxle shaft seal. To replace the seal, the halfshaft must be removed.
CV JOINT REPLACEMENT
When a CV joint has failed and needs to be replaced, there are a variety of replacement options: new joints, remanufactured joints and complete replacement shaft assemblies with new and/or remanufactured joints. Many professional installers prefer complete shaft assemblies because they eliminate the mess of changing individual joints and save installation time. Many shafts also have a lifetime warranty, which eliminates worries about comebacks (or at least covers the replacement cost & labor).
The degree of difficulty to remove a halfshaft from a FWD vehicle varies considerably from application to another. Some applications require special tools. Separating the lower ball joint from the steering knuckle may require a ball joint puller or fork. Pushing the outer CV joint stub shaft back through the wheel hub often takes a special puller. On some Japanese applications, the shaft must be pressed out which often damages the wheel bearings. On some cars, the inner CV joint stub shafts are retained in the transaxle by a circlip and may not pull out without the help of an axle puller. Some older Chrysler applications even require removing a cover on the transaxle so a retaining clip inside the differential can be released before the shafts can be pulled out. Some applications (older Ford Escorts, for example) also require the use of a pilot tool (or removing only one shaft at a time) to prevent the differential gears from slipping out of position.
The general procedure goes as follows:
1. Loosen the axle hub nut with the wheel on the ground using a breaker bar or torque wrench. An impact wrench should not be used because the hammering can damage an otherwise good CV joint as well as the differential gears in the transaxle. The brakes should be applied to keep the car from rocking. On vehicles where the hub nut has been staked to hold it in position, DO NOT attempt to unstake the nut. Just turn it off.
NOTE: Most vehicle manufacturers recommend replacing the axle hub nut. Once used, the nut loses its ability to retain torque. So the old nut should be discarded and replaced with a new one.
2. Raise the vehicle and support it under the chassis crossmember or side rails so the front suspension can hang free. The wheel can now be removed.
3. What comes next depends on how the inner CV joint is attached to the transaxle:
If the joint is bolted to a stub shaft (such as the cross groove Rzeppa joint found on many imports), disconnect the inner CV joint first and then separate the outer joint from the steering knuckle hub. On many GM applications, the inboard CV joint stub shaft is retained in the differential gear by a circlip (except on the left hand side of automatics). To pull the shaft out, a special slide hammer axle puller tool is needed.
If the inner joint "plugs into" the transaxle and the stub shaft is part of the joint housing (tripod plunge joint and double-offset Rzeppa joints) the outer joint must be disconnected from the steering knuckle before the inner joint can be pulled out of the transaxle.

To separate the outer CV joint from the knuckle, one end of the knuckle (the lower ball joint or the MacPherson strut) must be disconnected so there will be enough clearance to push the outer CV stub shaft back through the knuckle.
On those applications where it is easiest to disconnect the knuckle from the strut (GM for example) it will be necessary to disconnect the brake hose clip and to remove the brake caliper from its mount.
On applications where disconnecting the ball joint is the path of least resistance (Ford and Chrysler for example) it may also be necessary to disconnect the sway bar from the lower control arm and/or the tie rod from the steering knuckle.
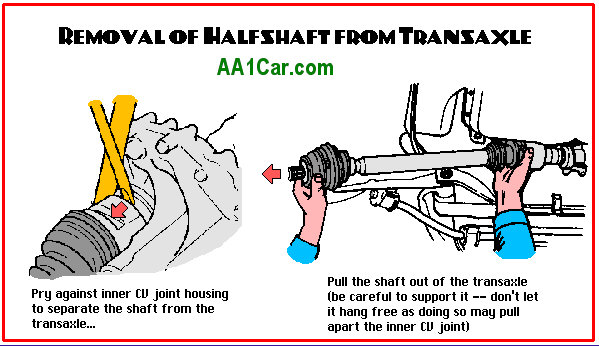
Once the knuckle is free to swing out, the end of the halfshaft can be pushed back through the wheel hub (a puller may be needed for this step). DO NOT pound on the end of the shaft as doing so may damage the wheel bearings, the splines in the hub, the differential gears or either CV joint.
As soon as the end of the shaft is free, DO NOT let it hang. Support it with a piece of wire until the inboard joint can be removed or unbolted from the transaxle. Allowing the halfshaft to hang or pulling on it will pull the inboard joint apart.
Installing the shaft is just the reverse. Once everything is back together and the wheel is in place, the lug nuts and hub nut should be installed and tightened to specifications using a torque wrench (not an impact gun unless torque limiting sockets are used).
 More FWD & CV-Joint Articles:
CV Joint Basics, Part 1
More FWD & CV-Joint Articles:
CV Joint Basics, Part 1
Inspecting Constant Velocity Joints & Halfshafts
How CV Joints are Remachined
 Click Here to See More Carley Automotive Technical Articles
Be sure to visit our other websites:

OBD2HELP
ScanToolHelp
TROUBLE-CODES