
Home, Auto Repair Library, Auto Parts, Accessories, Tools, Manuals & Books, Car BLOG, Links, Index
Kelsey-Hayes 4WAL Antilock Brakes
Copyright AA1Car.com
Copyright AA1Car.com
In 1990, Kelsey-Hayes introduced a new four-wheel anti-lock braking system (EBC4) on General Motors M- and L-series minivans (Chevrolet Astro and GMC Safari). General Motors refers to the system as 4WAL. The following year 4WAL was offered on the S- and T-series trucks (Chevy Blazer, GMC Jimmy 4-door) and the GMC Syclone. In 1992, the four-wheel anti-lock braking system was added to the two-door S- and T-series trucks, Suburban, full-size Blazer/GMC Yukon, Geo Tracker and the limited-production GMC Typhoon.
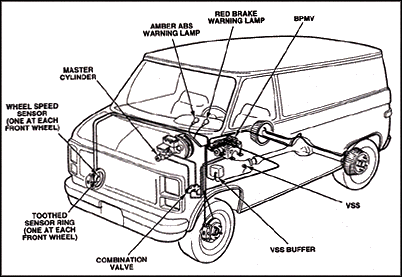
The 4WAL system is a nonintegral, four-wheel, three-channel ABS system with a conventional master cylinder and brake booster. Each front brake circuit is controlled independently, but both rear brakes are controlled as a pair. The system also functions in four-wheel drive, so it is a fulltime system unlike some of the earlier RWAL Rear Wheel Antilock Brake applications where the ABS system was deactivated when switching from two- to four-wheel drive.
On most 4WAL applications, four wheel speed sensors are used (one for each wheel). On the 1992 Suburban, however, only the front wheels have individual speed sensors. A transmission-mounted vehicle speed sensor provides a common signal for both rear wheels.
The front wheel speed sensors on two-wheel-drive trucks are located on the splash shield behind the brake rotor, with the sensor ring behind the rotor. On four-wheel-drive trucks, the front sensors are mounted behind the splash shield and can be replaced without having to pull the brake rotor. The tone ring, however, is part of the wheel bearing assembly. Air gaps on both types of front wheel speed sensors are nonadjustable and are factory set at .050 inches.
The rear wheel speed sensors are located on the rear brake backing plates with rings pressed onto the ends of the axle shafts. The air gap is nonadjustable.
On all 4WAL applications except the 1992 Suburban, the signals from the wheel speed sensors go directly to the electronic control unit (no DRAC module is used). But on the Suburban, the speed sensor signal for the rear wheels first goes through an electronic "buffer" that's similar to the DRAC module in RWAL applications. The buffer divides up the vehicle speed signal into various frequencies that are used by the cruise-control system, engine-control module and electronic speedometer and odometer, as well as the anti-lock brake system.
The ABS control module is mounted on the hydraulic modulator assembly, which General Motors calls the Electro-Hydraulic Control Unit (EHCU). One variation is the EBC4-VCM system on 1994 and up Chevy S- and T-series trucks. On these applications, there is no ABS control module on the modulator. The ABS control electronics have been integrated into the engine control module so a single module controls both systems.
The ABS control module receives input from the wheel speed sensors and a brake pedal switch. On trucks with automatic transmissions, the brake switch circuit contacts also control power to the transmission torque converter clutch. The switch is normally closed, and provides a 12-volt electrical signal to the ABS controller. With the brake pedal applied, the switch opens and supplies less than one volt to the controller.
The 4WAL system also has a 4WD switch and indicator light. The 4WD switch is needed to change the ABS control logic when the vehicle is shifted into four-wheel drive. The switch is mounted on the front axle in T-series trucks, and is open in two-wheel drive, supplying less than one volt to the controller. The switch is closed in four-wheel drive and supplies 12 volts to the controller. The switch is part of the indicator light circuit and is mechanically operated by the shift linkage in the transfer case.

For diagnostic purposes, there's both a red BRAKE and amber ANTI-LOCK warning light - instead of the single red BRAKE warning light that's used on Kelsey-Hayes rear-wheel ABS systems. There is also an Assembly Line Diagnostic Link (ALDL) diagnostic connector which can be used for manual fault code retrieval or diagnosing with a scan tool.
The EHCU contains six ABS solenoid valves, an isolation valve and a modulation valve for each of the three individual brake circuits. The EHCU also has a single pump motor that drives two separate pumps (one for the front brakes and the other for the rear brakes). The relay for the pump motor is located inside the EHCU. Also inside the EHCU are four pressure accumulators - one front and one rear low-pressure accumulator, and one front and one rear high-pressure accumulator. There are also three reset switches (one for each front brake and one for the combined rear brake circuit). The EHCU is located under the master cylinder in the engine compartment on the Astro and Safari vans, and on the left wheel well on S- and T-series Blazers.

During normal braking, fluid pressure from the master cylinder passes through the normally open isolation and modulation solenoid valves in the EHCU to the individual brakes. But, when the controller senses that wheel lockup is about to occur during braking, it activates anti-lock braking.
The EHCU begins ABS operation in the usual way by energizing the ABS isolation solenoid for the affected wheel to block any further pressure increase to the brake. At the same time, the pump motor relay is energized to start the pump. This primes the system and builds pressure in the high-pressure accumulator for the pressure increase phase of anti-lock braking. The next step is to energize the delay ABS solenoid, which is referred to as the Pulse-Width Modulation (PWM) valve, to bleed pressure from the brake. The 4WAL control module can vary the amount of pressure decrease by varying the valve's open or ON time. It does this by varying the ON time or duration of the voltage to the solenoid.
When the PWM valve is energized and closes, it opens a passage that allows pressure to be released from the brake circuit. The pressure is dumped into one of the two low-pressure accumulators. The spring-loaded low-pressure accumulator (LPA) serves as a temporary storage reservoir to hold the fluid until it can be rerouted back into the system. It also maintains sufficient fluid pressure in the EHCU to keep the high-pressure pump primed.
As pressure is reduced in the brake circuit that's being controlled, the reset switch for that circuit may trip signaling the ABS control module that fluid pressure has dropped to the point where additional pressure is needed to maintain proper braking action. At this point, the control module will de-energize the PWM valve and initiate the pressure increase mode.
When the PWM reopens, fluid pressure from the high-pressure accumulator (HPA) and high-pressure pump enters the brake circuit and builds brake pressure. This reapplies the brake as the wheel continues to decelerate. This reset switch also returns to its normal position as pressure is restored. The ABS controller then continues to cycle the PWM valve as needed to prevent wheel lockup for the duration of the stop.
During the pressure hold, decrease and increase phases of anti-lock braking, the isolation valve for the brake circuit remains closed. This blocks brake pressure from the master cylinder so it can't enter the brake circuit being controlled. The reapplication of brake pressure, therefore, must come from the high-pressure pump and accumulator.
Once the need for ABS braking has passed, the isolation and PWM valves are de-energized and normal braking is restored. The residual pressure that remains in the high-pressure accumulator is bled off into the master cylinder reservoir and the system returns to the passive mode until it is needed again.
The self-diagnostic capabilities of the 4WAL system are much better than the earlier RWAL or RABS system, and include more fault codes and the ability to log and display multiple codes. The controller monitors all system inputs while driving, and performs an automatic self-test every time the vehicle is started and driven faster than eight mph. Initial self-checks can reveal problems such as opens or shorts in the wheel speed sensors, internal problems in the electronic controller, and problems in the ABS and brake light warning circuits.
The self-diagnostics will also check for abnormal wheel speed sensor readings at speeds above three mph. When the vehicle reaches eight mph, the controller cycles the solenoids, relays and pump motor to check their operation. The auto test may be heard and felt by the driver while it is taking place, but does not indicate a problem. If the brake pedal is depressed (or the switch is open), the system will not perform the self-test until the pedal is released.
The controller will illuminate the amber ABS warning light when a fault is detected, log a code and disable the ABS system. The ABS light will remain on as long as the key is on, and will come on again the next time the engine is started if the problem still exists. If the problem is intermittent, the warning light will not come back on until the problem repeats unless it is a "hard" (latching) code. A hard code will keep the ABS warning light on until the code is cleared from memory.

If a fault occurs in the ABS warning-light circuit, the red brake warning light will come on to alert the driver to ABS problems. The brake warning light will also come on if there is a hydraulic failure in either brake circuit.
Prior to checking the system for fault codes, the vehicle should be given a preliminary visual inspection to check for obvious problems:
The 4WAL system provides manual flash codes, and can also be accessed with a scan tool. Here's the manual procedure.
1. Connect a jumper wire between pin "A" and pin "H" on the diagnostic connector under the instrument panel (or ground pin "H"), and turn the ignition on. This puts the system into the self-diagnostic mode.
2. Codes are displayed by flashes of the ABS warning light. Count the flashes to determine the code number. If the ABS warning light circuit is defective, the codes will be flashed out by the brake warning light.
The first series of flashes will represent the first digit of the fault code. The second series of short flashes that follow a brief pause represent the second digit of the code. A code 12, for example, would appear as a flash, pause, flash, flash.
One of the codes received will be a normal system code: code 12 with the brake not applied in the 2WD mode; code 13 with brake applied in 2WD mode; code 14 with brake not applied in 4WD mode; or code 15 with brake applied in 4WD mode. This normal code allows the brake and 4WD switches to be tested without having to use a scan tool.
Each code will repeat three times before the next code is displayed.
To erase stored fault codes, a scan tool or the following manual procedure can be used.
1. Turn the ignition switch on.
2. Connect a jumper wire or key between diagnostic connector terminals "H" and "A" (or ground "H") - and wait two seconds.
3. Remove the jumper wire for one second.
4. Repeat the grounding for two more seconds. The ABS warning light should go out if the codes have been successfully erased.
This procedure is necessary only on certain hard codes. Soft codes can be cleared by correcting the system problem and turning the ignition off for approximately five seconds.
The Kelsey-Hayes 4WAL ABS system can also be diagnosed with a scan tool. However, a bi-directional scan tool with the appropriate software is necessary to read history codes and to perform various tests. These include:
History codes in the 4WAL system reveal the number of ignition drive cycles since a fault occurred. A drive cycle is defined as the vehicle being started and driven above a specified speed, usually about eight mph with the 4WAL system.
A pedal that gradually sinks to the floor usually indicates a worn master cylinder. But on Kelsey-Hayes rear-wheel ABS applications, the condition may be caused by dirt in the ABS modulator valve. Dirt can prevent the dump valve from fully seating and allow rear brake pressure to leak past the valve.
To isolate the problem, disconnect the steel brake line from the master cylinder that supplies the rear brakes. Then have a helper depress the brake pedal about an inch to purge air from the outlet port. Install a tube plug in the port and tighten it, making sure pedal pressure is maintained to prevent damage to the primary cup as it moves across the vent port in the master cylinder. If the pedal continues to sink after the plug is installed, the master cylinder is leaking and needs to be replaced. If the pedal holds firm, however, then the problem is in either rear brake circuit or the ABS control valve. To pinpoint the problem, block off the outlet port at the ABS control valve and recheck pedal feel as before. If the pedal now feels hard, the problem is probably a leaky rear wheel cylinder. But if the pedal continues to sink, the ABS dump valve is leaking and the ABS control valve assembly needs to be replaced.
Brakes can be bled in the usual way manually or with pressure or vacuum equipment. The wheel bleeding sequence is RR, LR, RF, LF. If a pressure bleeder is used, the combination valve must be held open.
If the EHCU Modulator or accumulator have been replaced, or air has entered the ABS part of the system, the EHCU modulator will have to be bled using one of two special procedures:
The preferred method is to cycle the ABS system using a factory scan tool or an aftermarket pro-level scan tool that has bi-directional capabilities so it can access the ABS system and cycle the pump and solenoids. A basic DIY scan tool that only reads codes and sensor data cannot do this.
If you can't get your hands on the proper scan tool, you can use the following manual bleeding procedure:
1. First, bleed the entire brake system using a pressure bleeder or vacuum bleeder. Pumping the brake pedal also works but must be done carefully so air doesn't siphon back into the lines. Bleed the wheels in this order: Right Rear, Left Rear, Right Front, Left Front.
2. Once all the air is out of the master cylinder and brake lines (no bubbles in the clear plastic bleeder hose you have attached to each of the calipers or wheel cylinders), you can proceed to bleeding the ABS system.
3. Open the internal bleed screws on the modulator one quarter to a half-turn. These are the cap screws on either side of the modulator. Note: Some newer 4WAL systems do NOT have these bleed screws so you must use a scan tool to bleed the system or try loosening the brake lines to the modulator to vent air.
4. Connect special tools (such as Kent-Moore No. J39177) to hold open the high-pressure accumulator bleed valves.
5. Open the two bleeder screws at the BPMV and bleed the unit by forcing fluid through it with a pressure bleeder or by slowly pumping the brake pedal. Do NOT allow the master cylinder reservoir to run low (add brake fluid as needed during this procedure).
6. Bleed the wheels again as before: RR, LR, RF, LF
7. Tighten the modulator bleed screws and remove the tools from the high-pressure accumulators.
8. Turn the ignition on and start the engine. Press down firmly on the brake pedal several times. If the pedal does not feel firm, turn the engine off, pump the pedal to relieve residual pressure in the system, and bleed each of the four brakes as before to get rid of any air in the system.
It's a pain to go through all of these steps, but if you do not and air is trapped in the ABS unit (or pump on applications that have a pump), it will eventually get into the lines and give you a soft pedal.
 Related Antilock Brake Articles
 Click Here to See More Carley Automotive Technical Articles